


RMClient is an application created to record working hours in the project management system Jira, Jira Cloud and Redmine.
The RMClient application allows tracking time 7 in the Jira and Redmine project management systems.
RMClient also supports Easy Redmine, Planio, etc.
To get started, you need to:
- Install the RMClient application. For more information, see Install and Update
- Buy license key License Key. Read more about License.
- Register an account with JIRA Cloud on the https://www.atlassian.com/
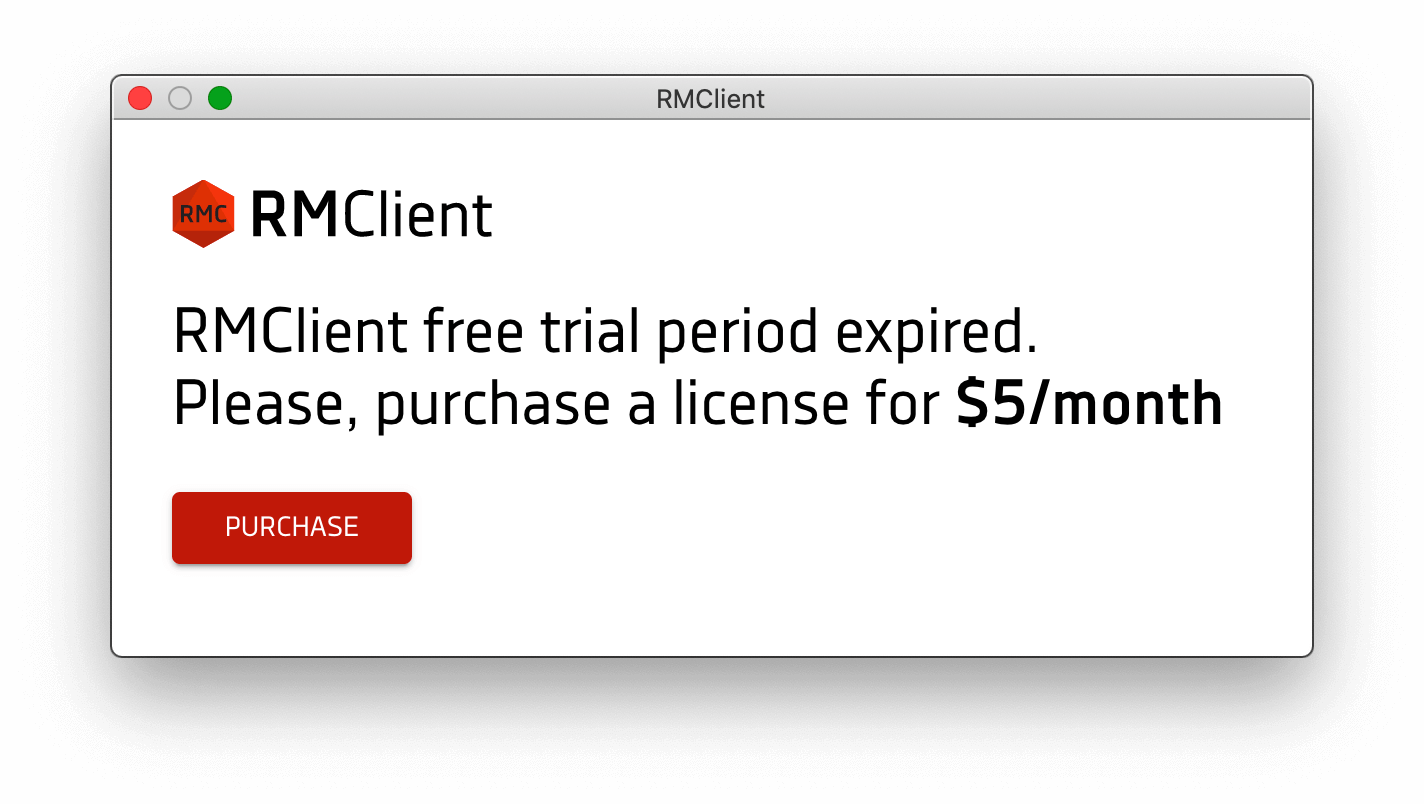
Trial period allows you to use the app within 30 days. You need to purchase a license to continue using RMClient.

To install RMClient on Windows you need to:
- Run the installation file — RMClient. exe;
- Click Install button;
- Confirm installation with the default settings or enter your own;
- RMClient starts automatically after successful installation.
Windows 7 and later are supported.
Older operating systems are not supported (and do not work).
Minimum macOS version supported is macOS 10.10 (Yosemite).
Older operating systems are not supported (and do not work).
To install RMClient on Mac OS you need to:
- Run the installation file — RMClient.dmg, then — Install RMClient;
- If there is a window notifying that the file was downloaded from the Internet, click Open.
- Confirm installation with the default settings or enter your own, click Continue;
- If needed enter Login and Password of Mac OS user to confirm installation;
- RMClient starts automatically after successful installation.
How to open a blocked app
- Open System Preferences.
- Go to Security & Privacy and select the General tab.
- If you've been blocked from opening an app within the past hour, this page will give you the option to override this by clicking the temporary button 'Open Anyway'.
- You'll be asked one more time if you're sure, but clicking Open will run the app.
How to 'Allow Apps from Anywhere'
But there is a third, hidden option: 'Allow apps from anywhere'. This used to be an option in earlier versions of macOS, but disappeared when macOS Sierra arrived. However you can get the Anywhere option back.
We will say right away that we don't recommend this setting, which puts you at risk of installing malware under the guise of legitimate software. But if you are determined on this course, it's possible to make that option reappear with a line of code in Terminal.
Open Terminal and enter the following code to get your Anywhere option:
sudo spctl --master-disable
Now press Return, and you will be asked to enter your password. Once that's done, open System Preferences (if it's already open, you'll need to quit it and restart to see the new options) and go to the Security & Privacy section.
How to remove the 'Anywhere' option
If you share your Mac with someone else it might be wise to get rid of the Anywhere option. To hide it again, you'll need to go to Terminal again, and this time type:
sudo spctl --master-enable
Only Ubuntu 12.04 is guaranteed to work,
but following platforms are also verified to be able to run:
- Ubuntu 12.04 and newer
- Fedora 21
- Debian 8
To install RMClient on Windows you need to:
1. Run the installation file — RMClient. deb or RMClient.Appimage;
2. Click Install button;
3. Confirm installation with the default settings or enter your own;
4. RMClient starts automatically after successful installation.
We announce to our customers the releases of RMClient new versions in Newsletters and posts on www.facebook.com/rmclient. An update is available to the customers with paid license and for those who use free 30-days trial.
After the new version release, when starting RMClient, the app will offer to download and install the new version.
A notification will display the Installed version and Version available to update, as well as short description of the changes in current version.
To install the update you need to:
- click «Download now» in the window that appears when you run RMClient;
- after the download is complete, click «Install» and update the app now, or choose the update after you restart the app.
When you choose to update the app immediately, the client will be closed automatically and updated.
While updating all data entered in Settings window, is stored.
The update process is similar for all supported platforms.
You can find description about latest releases here.
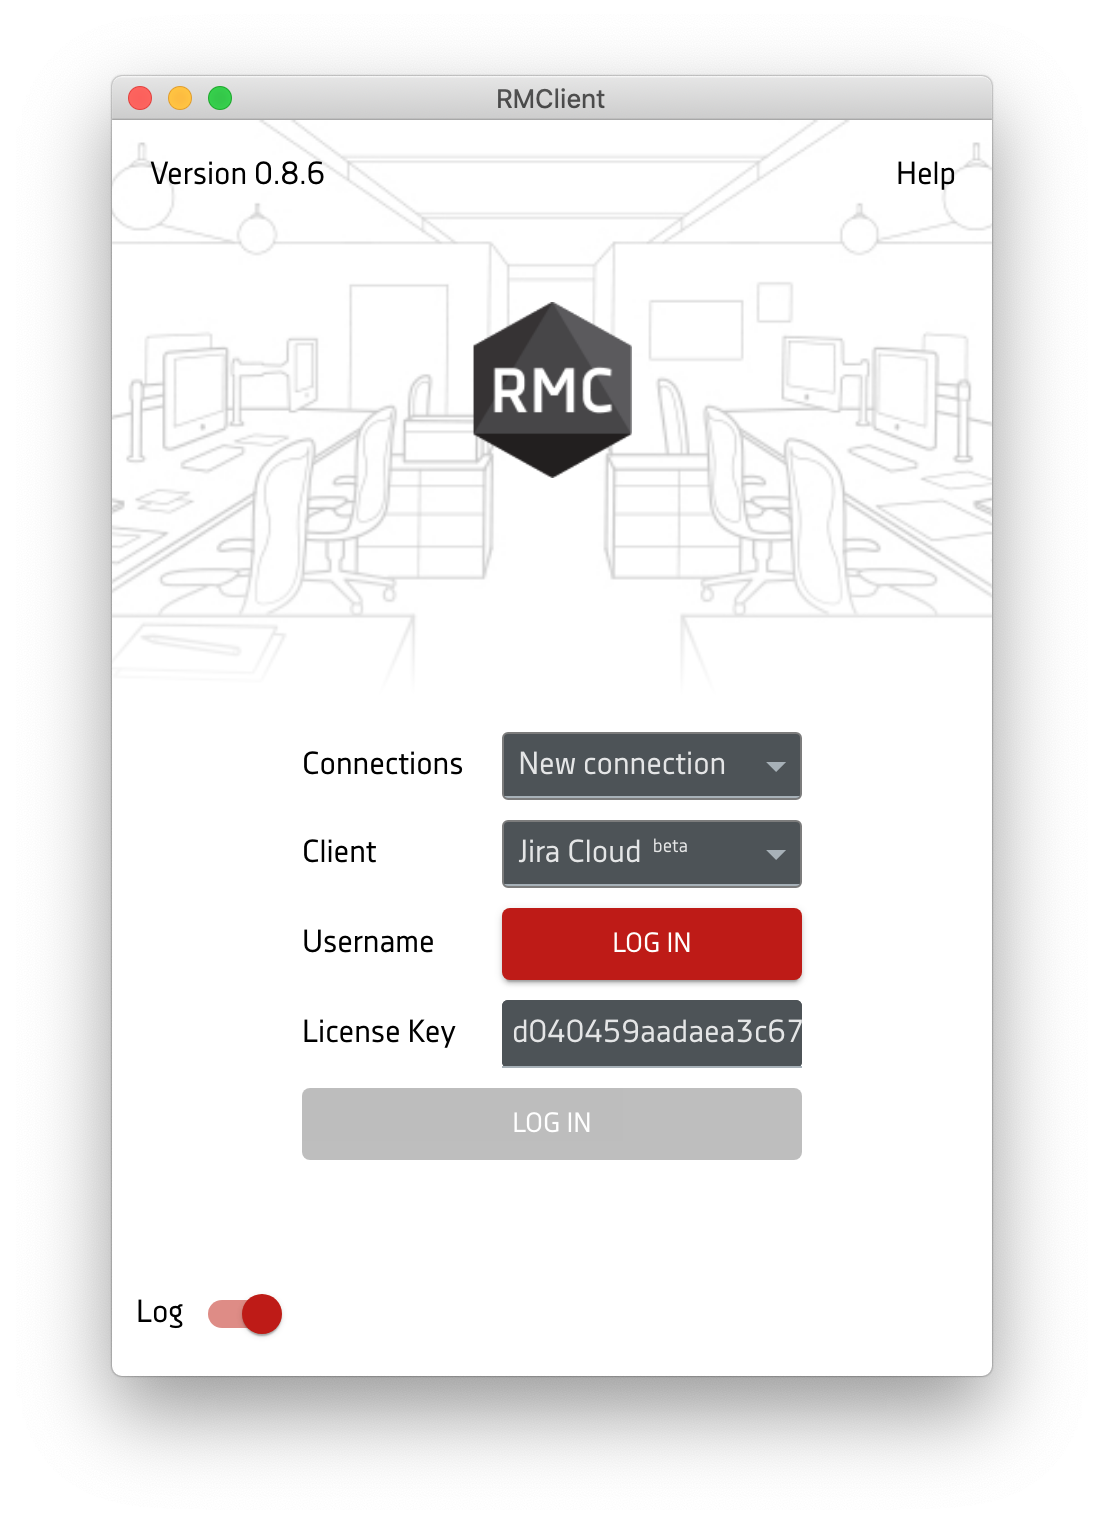
The Login screen allows you to create a new connection or select an already created connection and log in to the application.
Creating a new connection with authorization in Jira Cloud
To create a new connection, the user needs to:
1. Select New connections in Connections
2. Select from the list the Client - Jira Cloud
3. In the Username field, clicking the Log in button will open an authorization window.
- You must select a resource in the Authorize for authorization window.
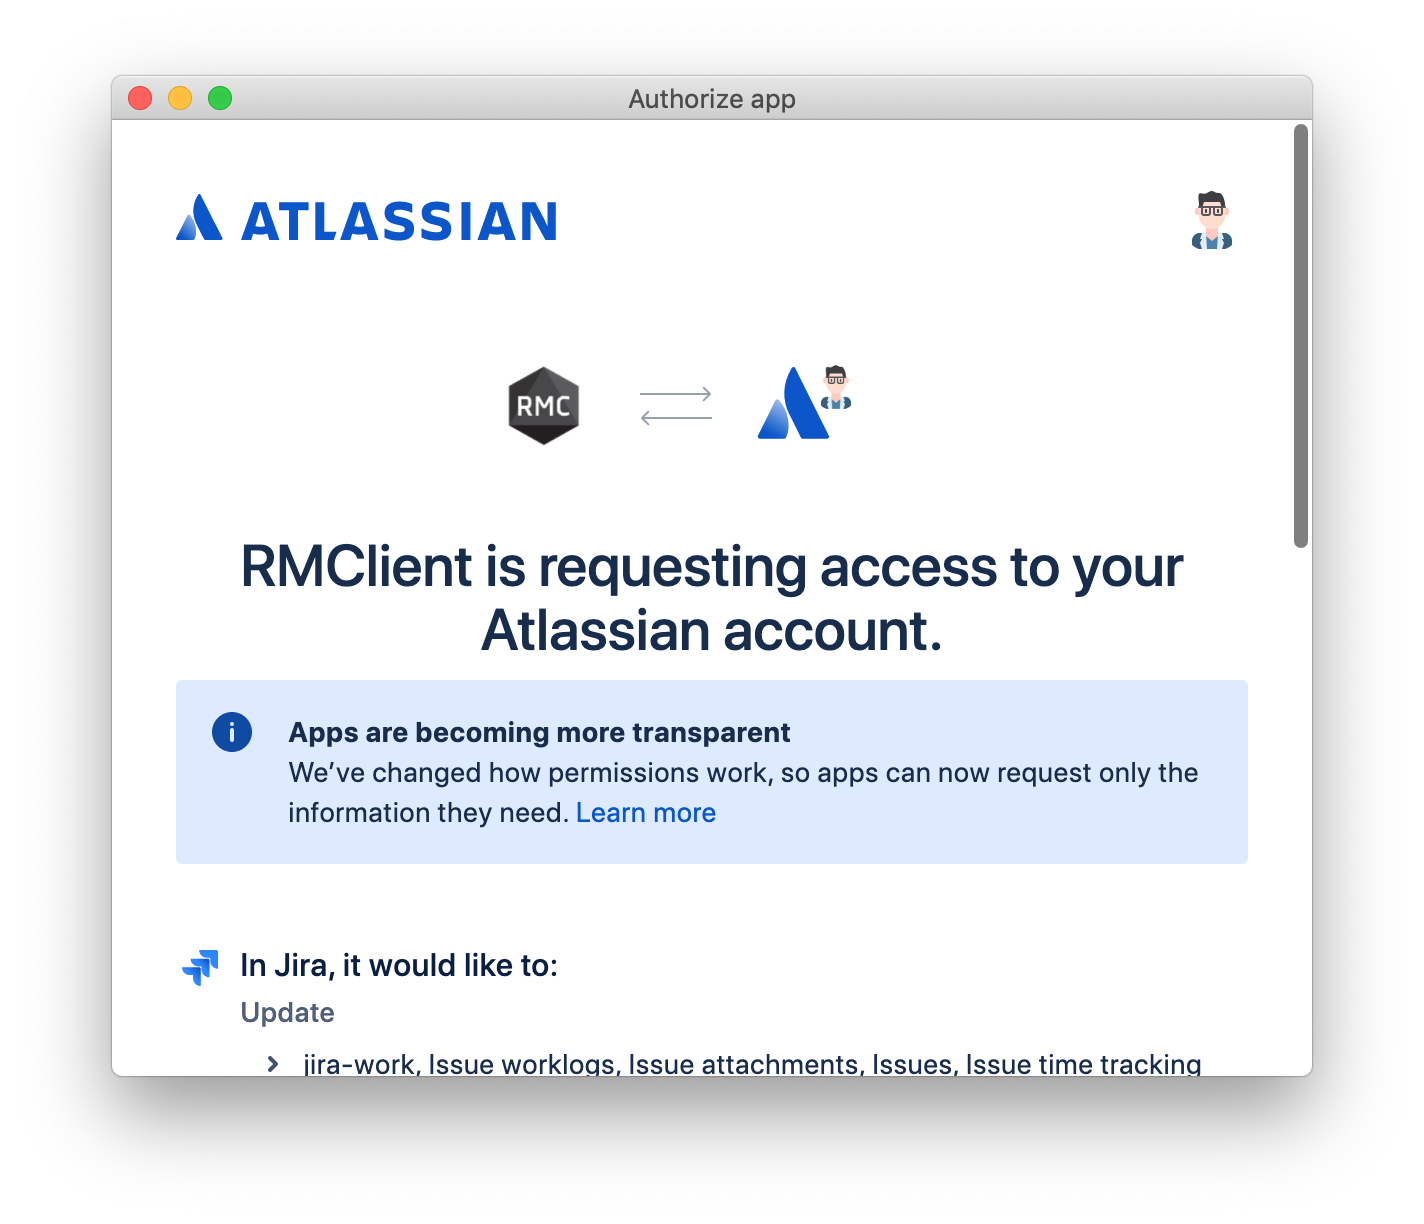
5. After clicking the Accept button, the authorization window is closed and the Username and Resources fields are automatically filled with user data.
6. To confirm the action, click Log in.
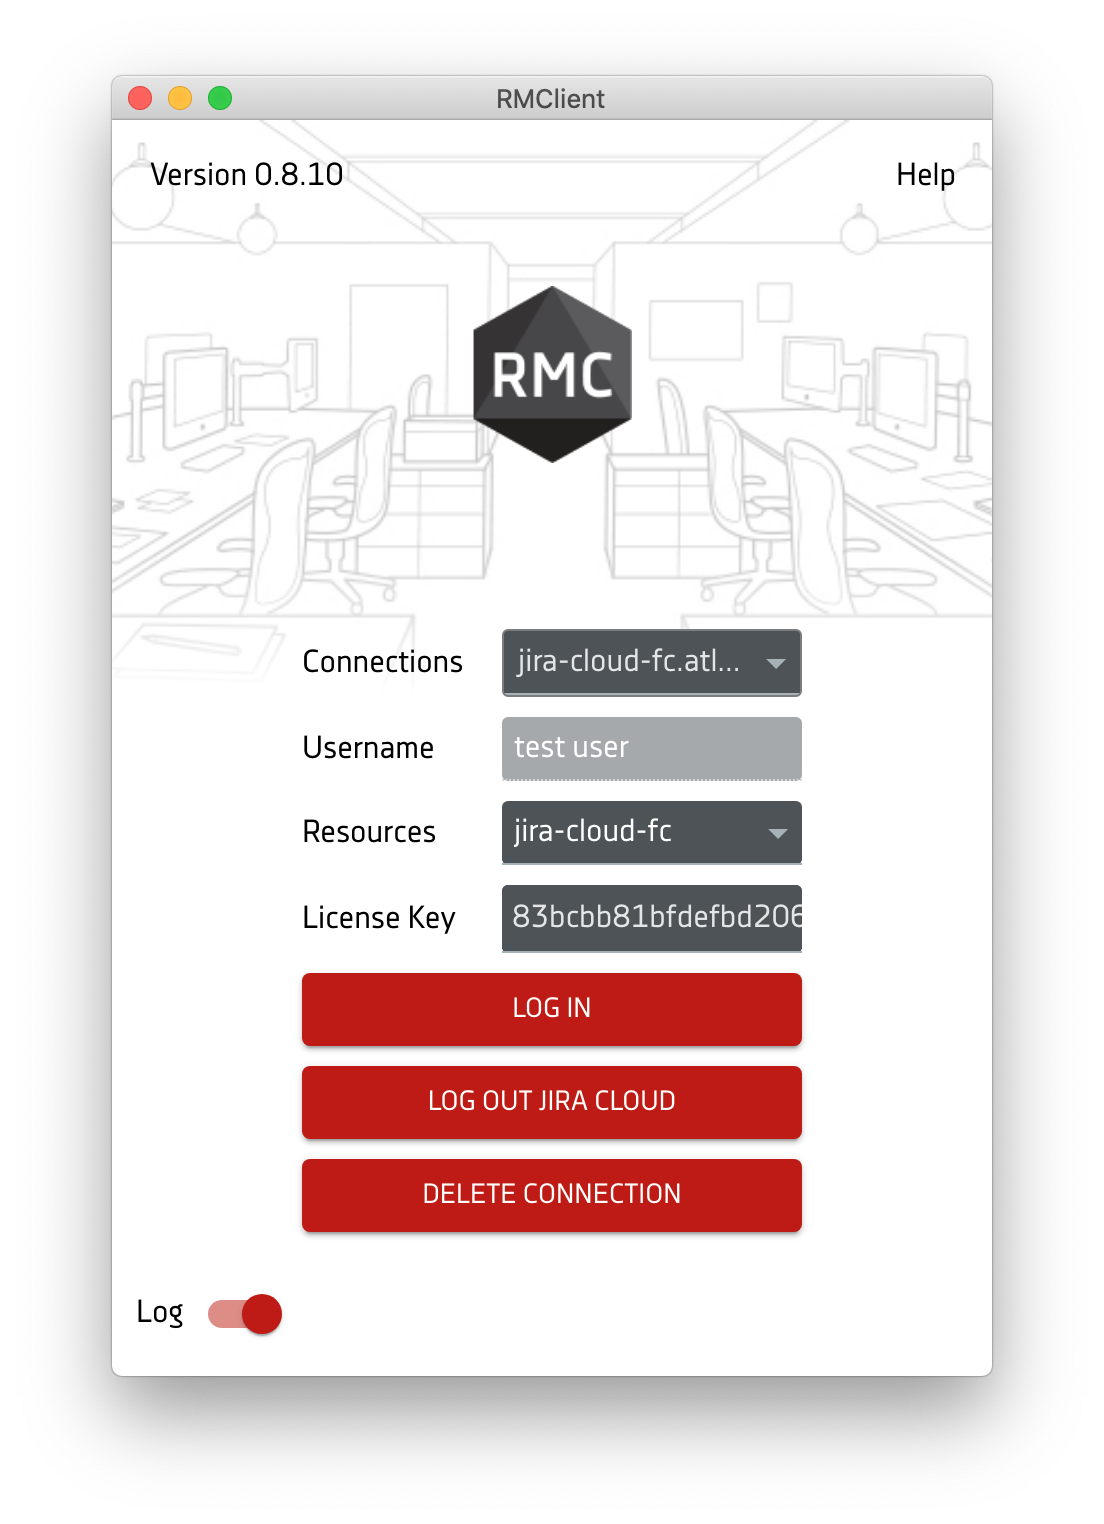
After entering the correct data in the input fields the User gets to the Main Screen. When entering erroneous data into the input fields, a prompt appears and the field is selected.
To remove a user and authenticate under a new user, you must press Log out Jira Cloud and go the authentication path again.
The login screen contains:
- the current version of the application - is displayed in the top left corner of the window
- Help button - allows you to navigate to the site section https://rmclient.org/help
- Connections field - list of connection types
- Client field - a field for selecting the client type, Jira Cloud
- Username field - user name in Jira Cloud
- Resources field - a field for selecting a resource name
- License Key field - License Key number. Allows you to use the application after the evaluation period.
- Log in and Log out Jira Cloud buttons - Jira Cloud user authorization/removal
- Log - Enables us to log technical information that will help us troubleshoot RMClient or configure it.
Change connection settings
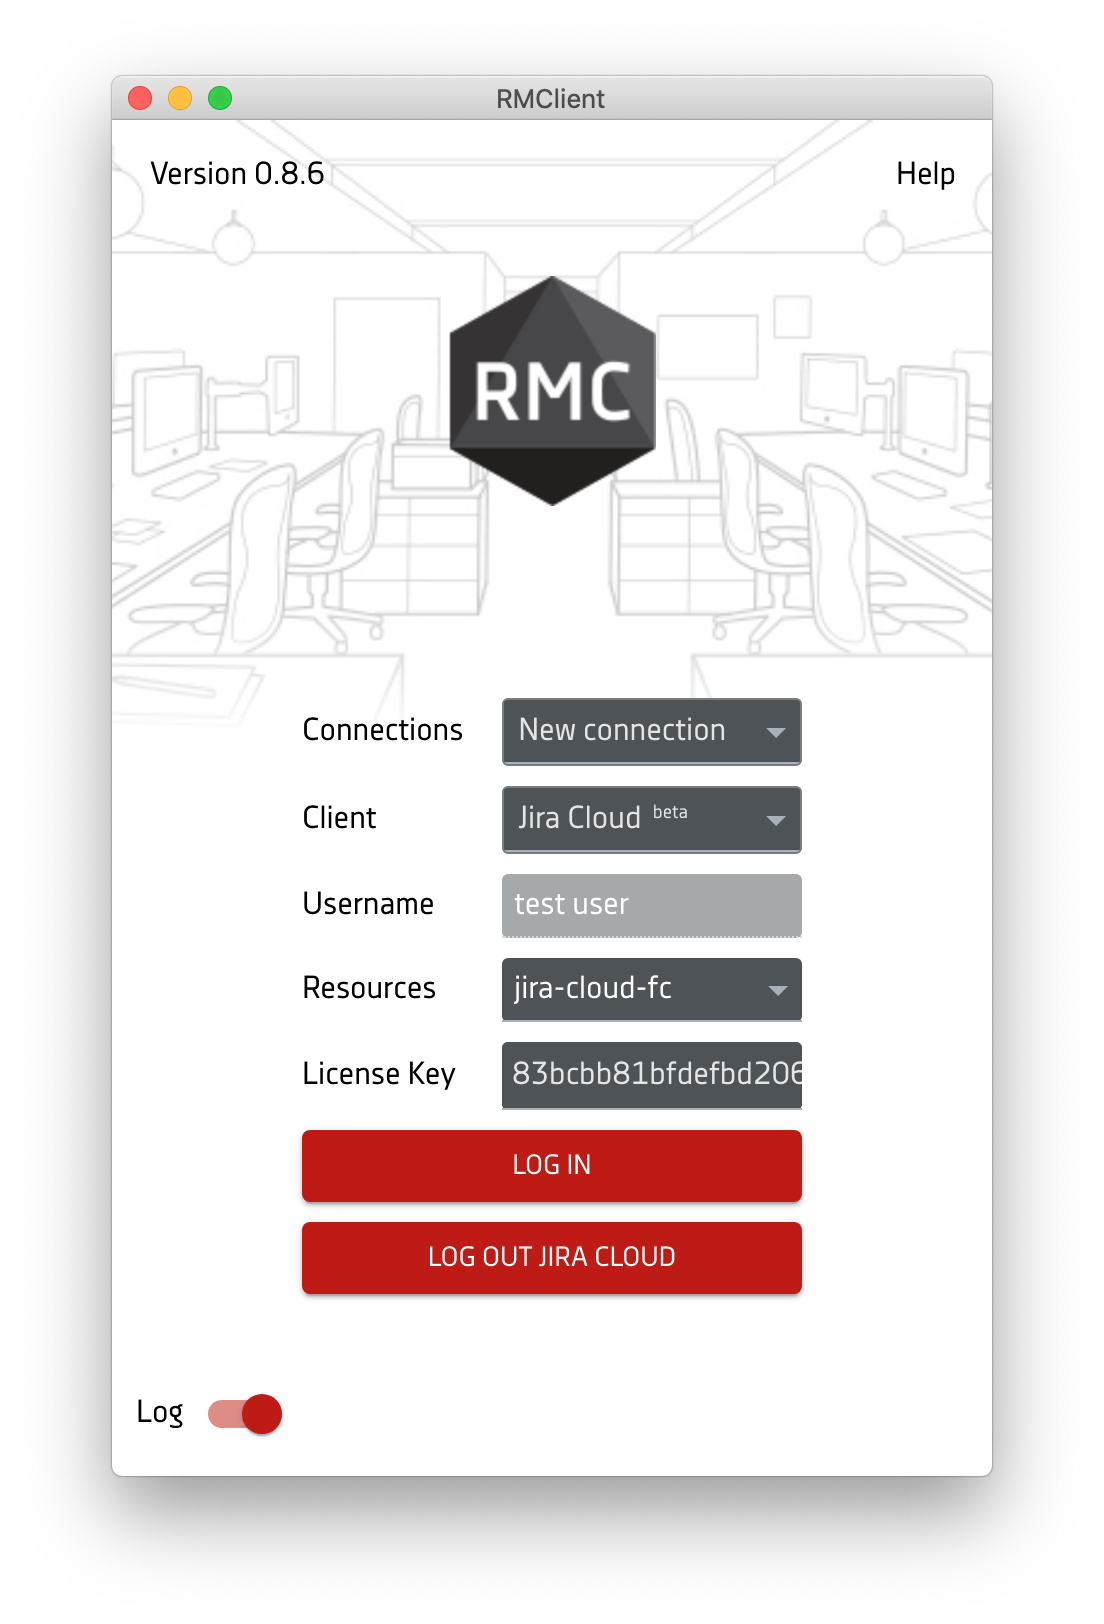
To change the parameters of connection with JIRA Cloud or License key use fields: Connections, Client, Username, Resources, License Key.
Connection type change
To change the connection type, select the connection type from the list box in the Connections box.
After selecting a previously logged connection type, the fields are restored and editable.
If you select a new connection type, the fields are cleared and must be filled in.
License Key allows you to use RMClient after trial period. Get your license now.
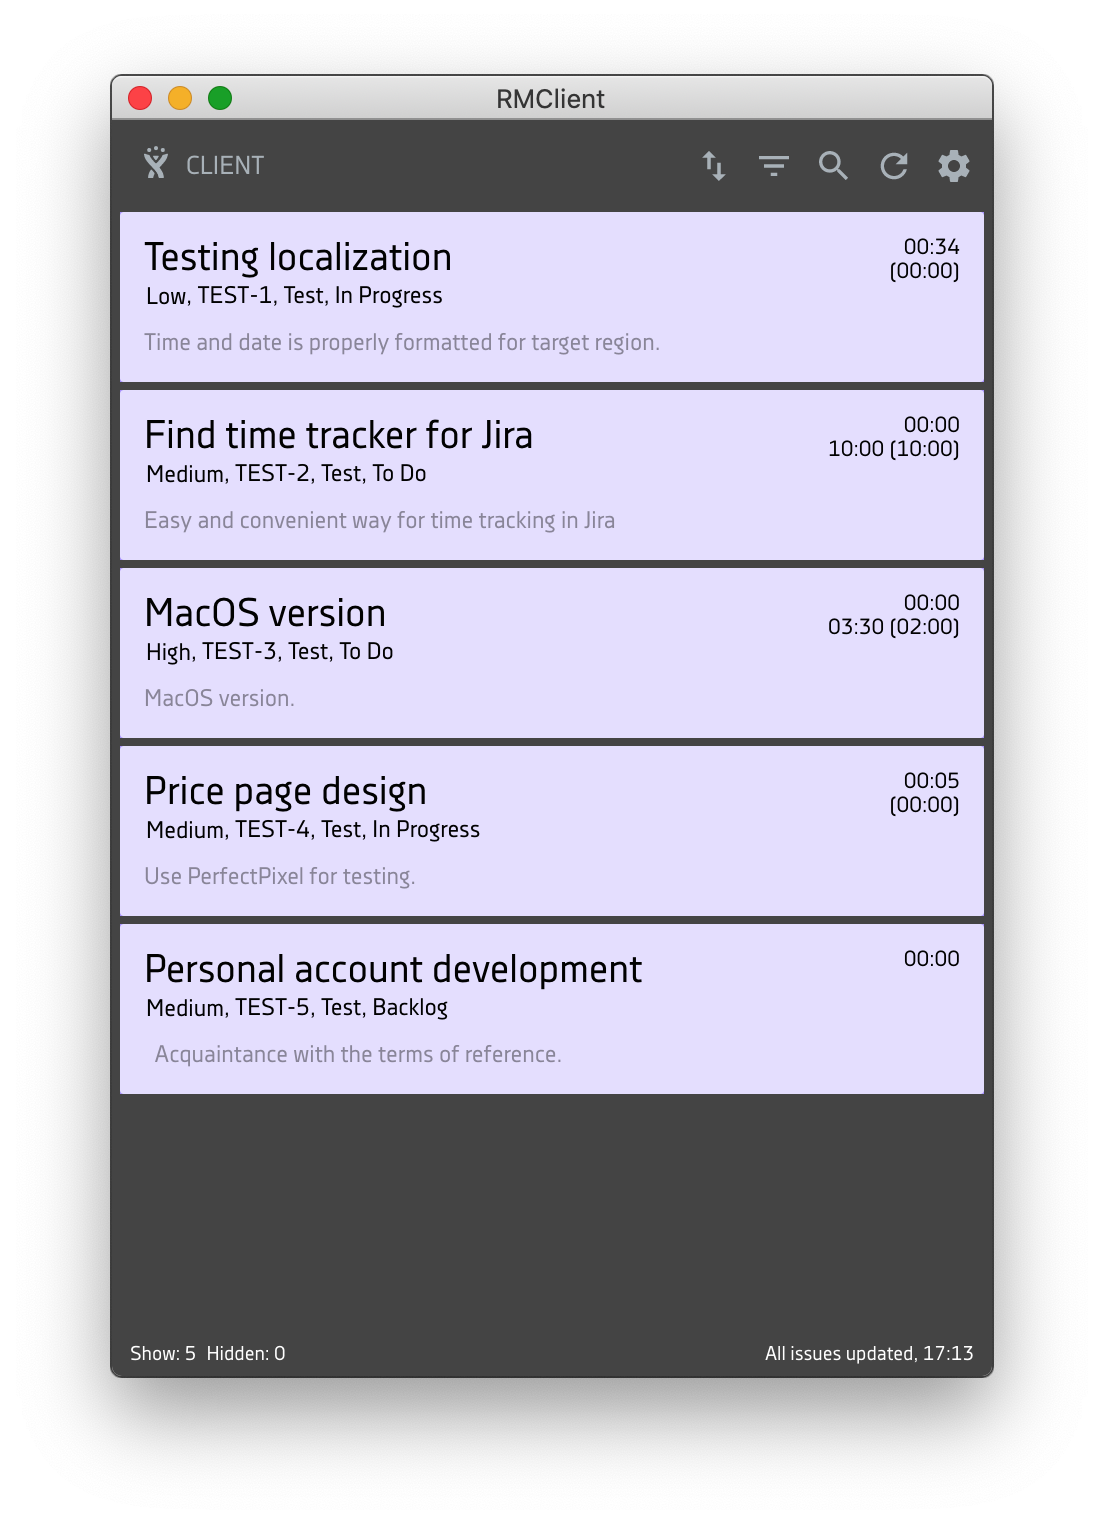
Once RMClient is connected to the Jira Server or Jira Cloud, the Main Screen will be displayed.
Main screen elements:
- User name;
- the right side of the top pane displays icons (left to right): Issue Sorting, Filter, Search, Update and Settings;
- list of Issues;
- the left part of the bottom pane shows the number of tasks displayed (Show) and hidden by the filter (Hidden);
- the time of the last synchronization is displayed on the right of the lower pane.
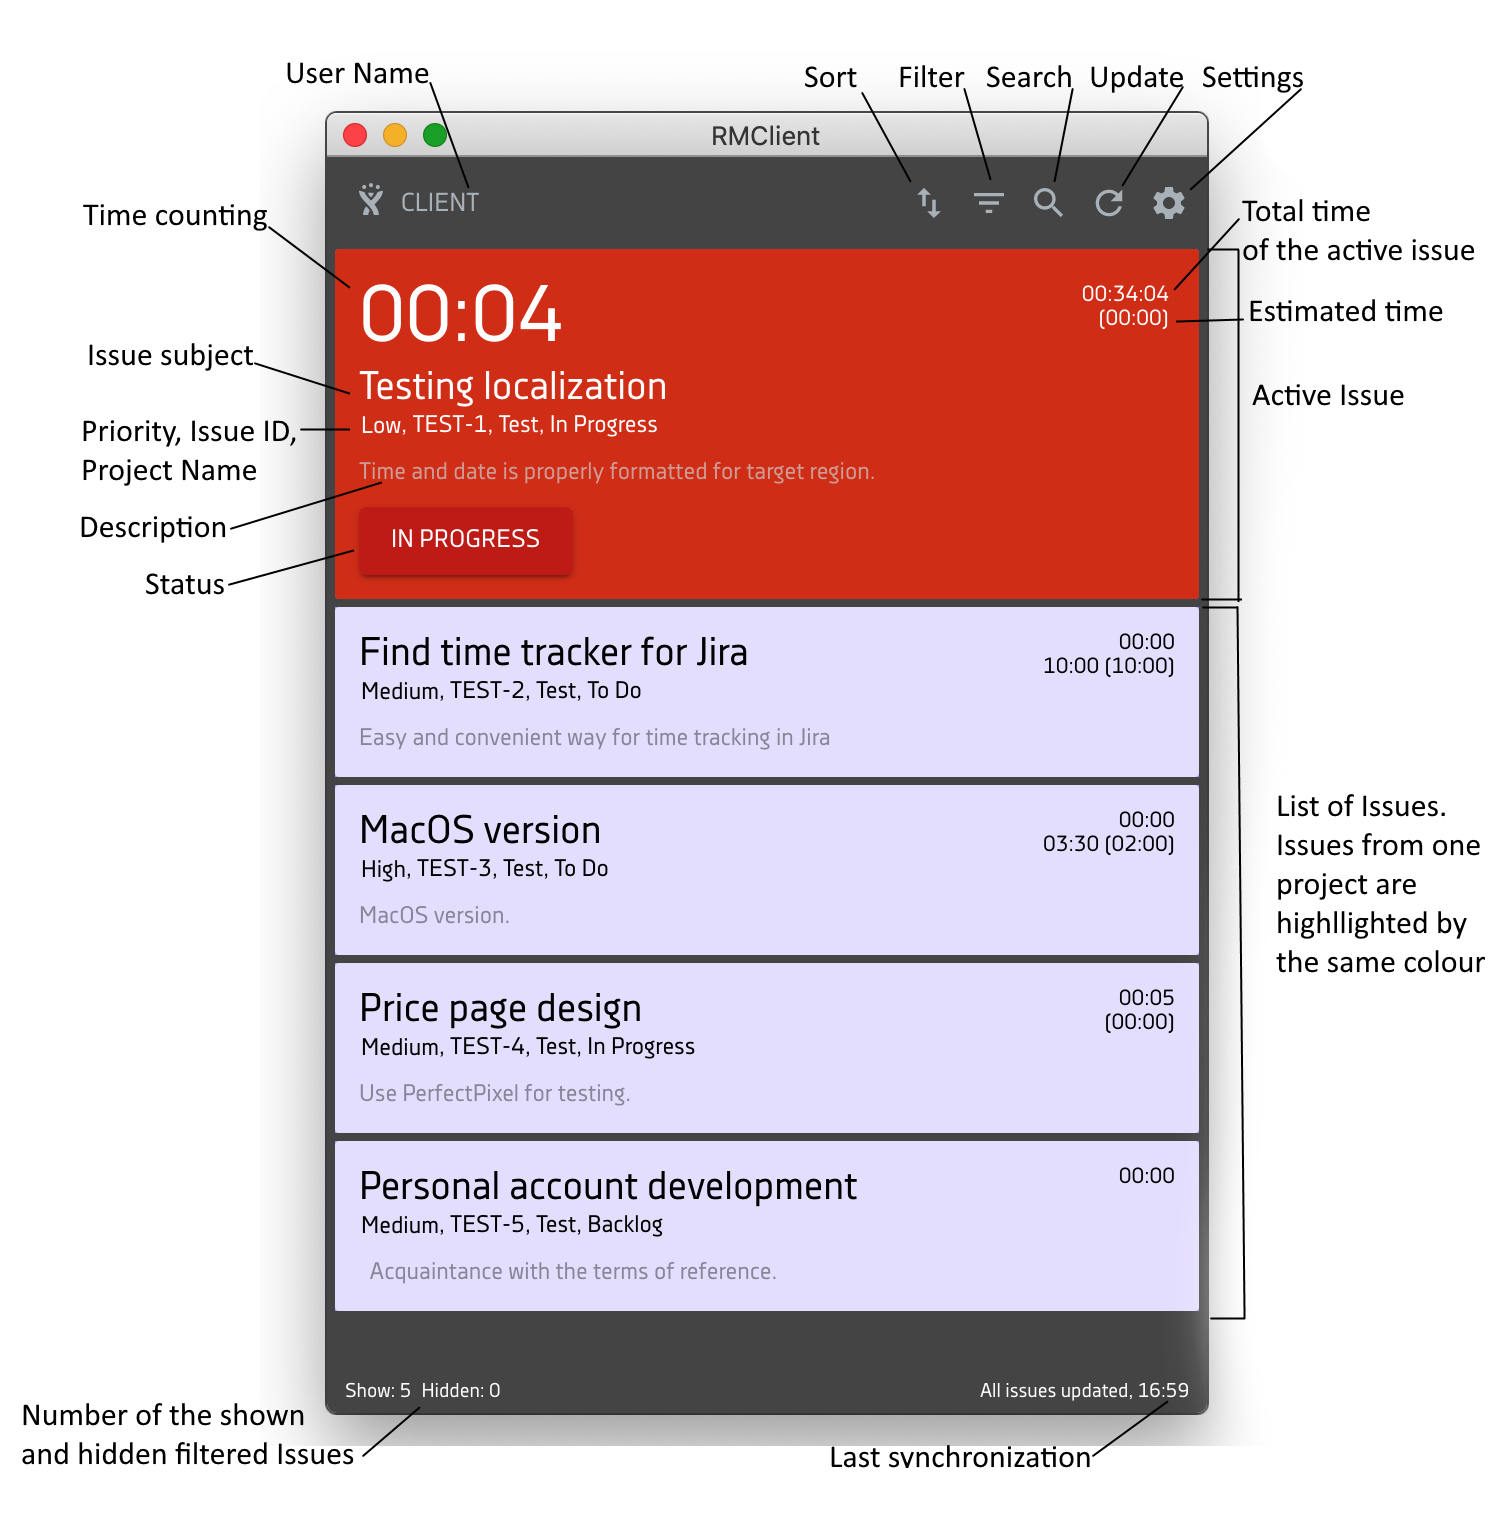
On the left side of the top pane you will see the User Name. Clicking on it will bring you to the Jira Personal Profile page.
Use the Issue Sorting feature to organize tasks and make it easier to find the task in the list.
With Issue Sorting, you can sort the tasks by the selected criterion, and also organize the tasks in the list.
The call to the "Sort" function is also available when the timer is active for another task and does not affect the time logging process.
To open a window, click the Sort button.
In Sort by, you must select a task sorting option in the list.
The following task sorting options are available:
The following task sorting options are available:
- Default - the list of tasks in the original form, sorting by priority of tasks
- Name - sorting by task name. The list is sorted alphabetically according to Directions.
- Priority - sort by priority of tasks
- Rank - sort by task order in the column of the board Kanban in Jira
- Project - sorting by project name. The list is sorted alphabetically according to Directions.
- Updated - sorting by update date. When you select Updated sorting, all tasks that have recently been updated will be at the top of the list.
- Created - sort by date created. When you select Created sorting, all new tasks will be at the top of the list.
In the Directions field, you can choose to order the tasks in the list:
- ASC - Sorting Results by Increase
- DESC - Sorting Results by Descending
To apply Sorting, select the required Sort by and Directions fields, and then click Apply.
To reset the Sorting, click the Reset button.
To hide Sorting, click again on the sorting icon in the top pane of the application.
After Sorting is applied, the bottom pane of the application will show the number of tasks displayed and hidden by the filter.
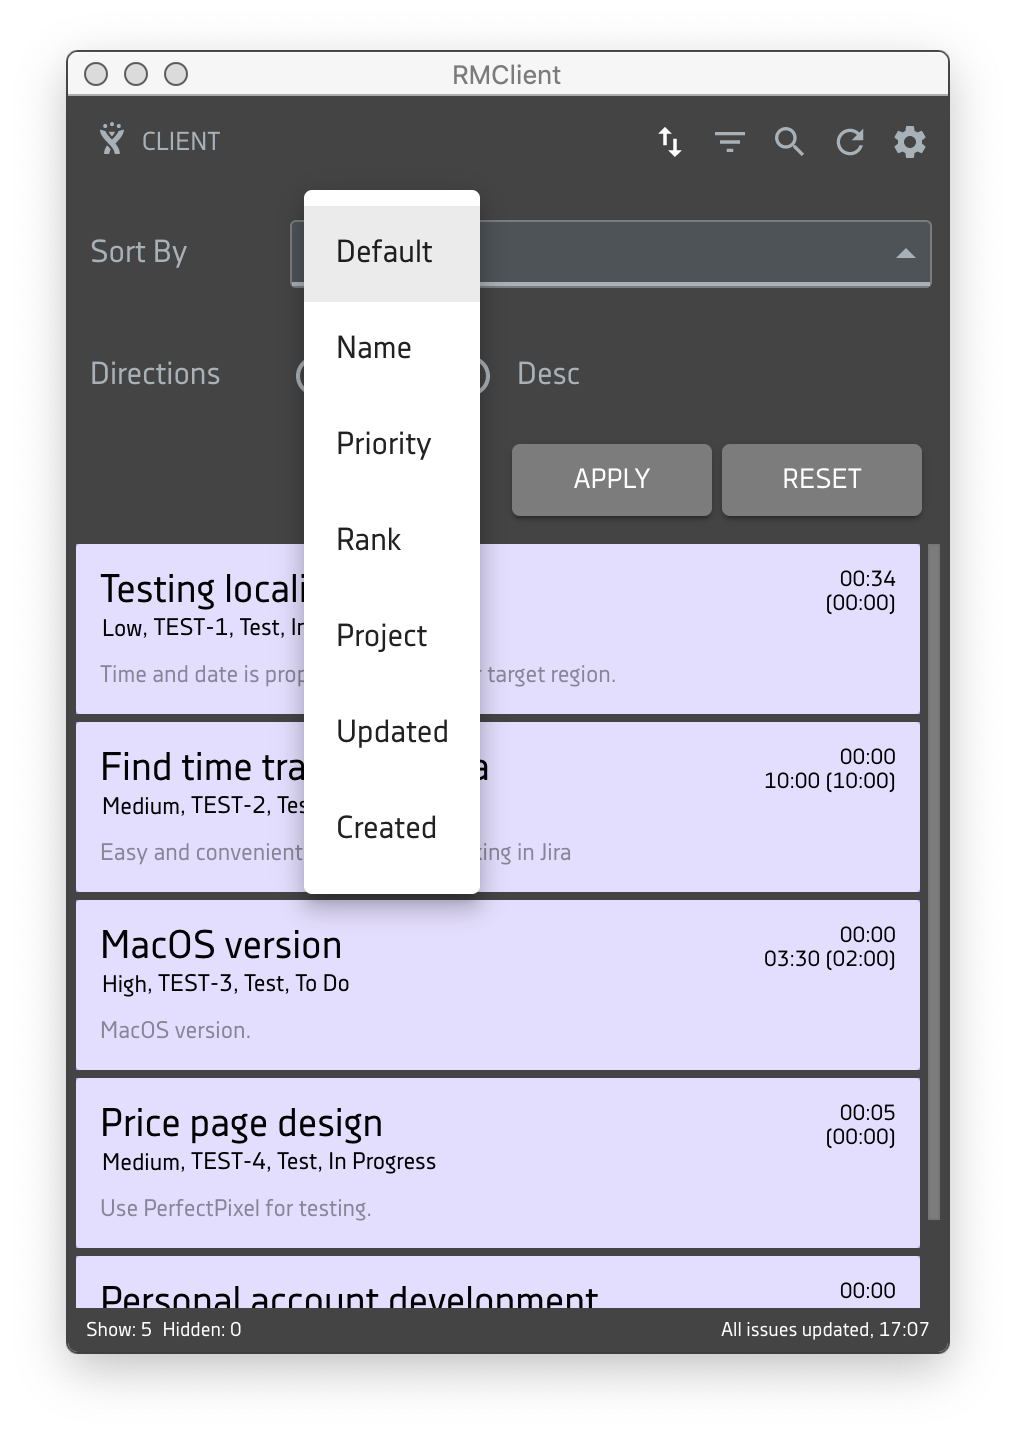
The Filter and Sort functions are related. If you have previously applied the Filter function to the task list, then by using the Sort function, you will sort the task list that was previously selected by the Filter.
If there are several tasks in the Task List that have been added to Favorites, then after you apply the sorting to the entire Task List, the Favorites tasks and the rest of the tasks in the list will be sorted independently according to the sorting type selected.
To make it easier to find the desired task in the list, use the task filter.
With the Task Filter, you can select tasks for one or more projects (Projects field), status (Statuses), task priority (Priorities), and other parameters, or by applying combinations of these filter criteria.
The Task Filter is also available when the timer is active for another task and does not affect the time logging process.
To open a window, press the Filter button.
The filter allows you to select displayed tasks by the following criteria:
- Project — the list of the projects names with issues assigned to you.
- Tracker — the list of trackers.
- Status — the list of statuses.
- Priority — the list of priorities.
- Version — the list of versions.
To apply the filter, select the required field combination, and then click Apply.
To reset the filter, click the Reset button.
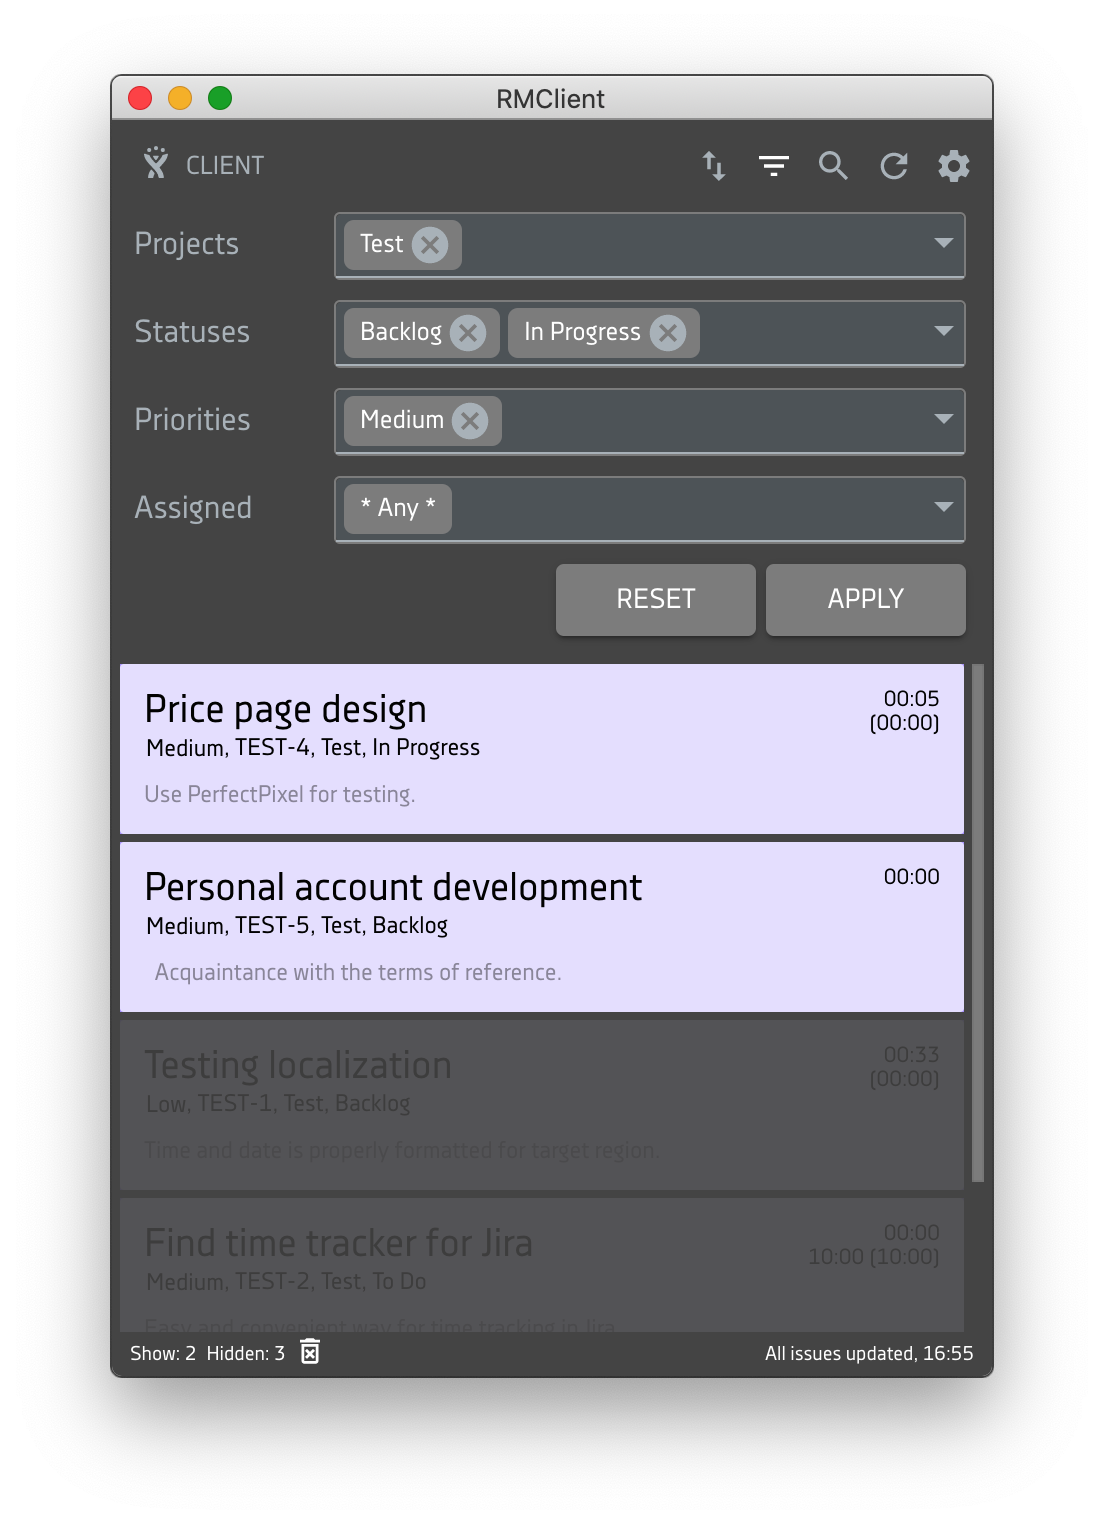
Choosing different parameters and their combinations will help you to find the desired tasks faster. For example, using the Statuses field you can select all New Tasks and then filter «important» in the Priorities field.
After applying the filter to the specified parameters, the application filters the tasks in the desired order. This way you can concentrate on new important tasks.
Also, after applying the filter in the bottom pane of the application will be shown the number of tasks displayed and hidden by the filter. To reset the filter, click on the Recycle Bin icon (Reset filter) in the bottom pane of the app.
Note
The selection of fields is interrelated. When selecting a specific Project, other fields will display all options, but only those that have tasks of the selected project will be active. This scheme works with all filter fields.
You can also open the Filters panel, by using the CMD+F/Ctrl+F key combination.
The search allows you to find the desired task by a word or word combination and takes place by the main fields of the tasks displayed in RMClient.
The exception is the time spent on the task. The Search function call is also available when the timer is active for another task and does not affect the time logging process.
To call the Search function, click the Search button, and then a query box appears.
After entering the first character in the Search box, the matching characters in the fields: ID Tasks in Jira, Task Name, Project, and Description are searched. As a result of the search, the tasks are filtered out. The tasks that fit the search criteria will be displayed in the list, and the rest of the tasks will be hidden.
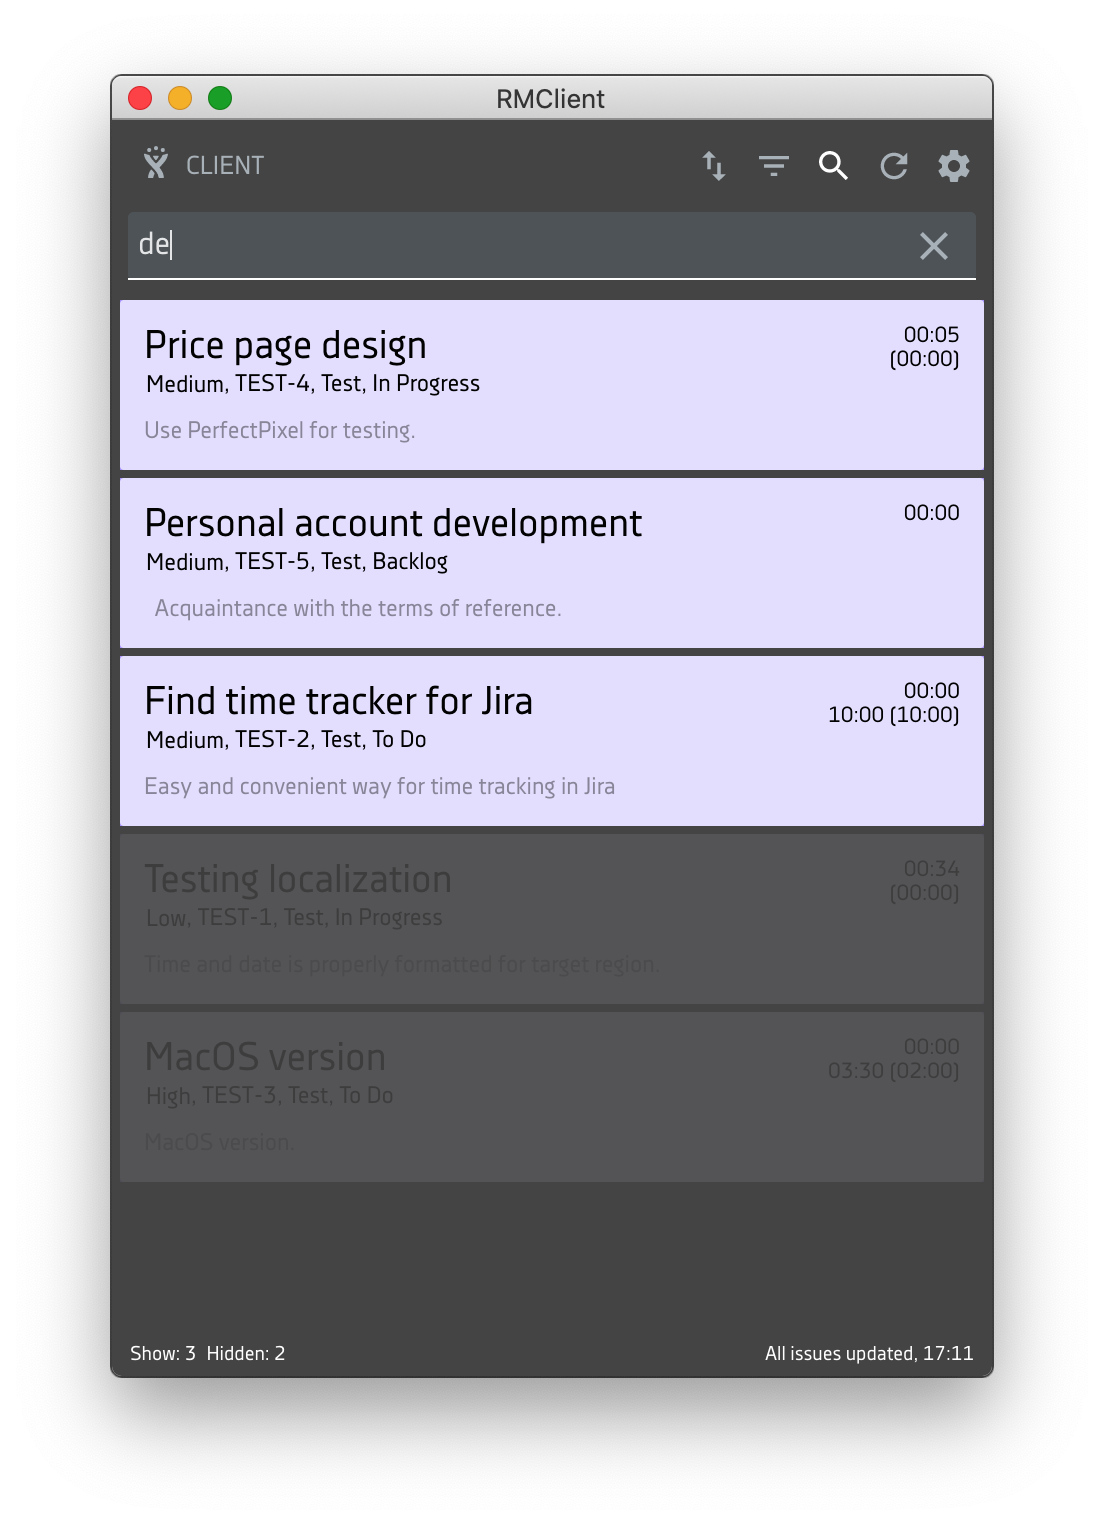
If the search function was started when the Task has an active timer, this task will remain fixed at the top of the list, the search results will be shown below.
The bottom pane of the application will show the number of displayed and hidden tasks. To reset the filter, click on the Recycle Bin icon (Reset filter) in the bottom pane of the app.
If there is no match with the search criterion on the screen, the Not found message appears.
In order to reset the search results, you must delete the entered criterion (word or word combination).
To close the search window, click the Close icon on the right side of the field.
You can also call the Search function, using the CMD+S/Ctrl+S key combination
This button allows you to immediately synchronize the client with your Redmine server to update the task list.
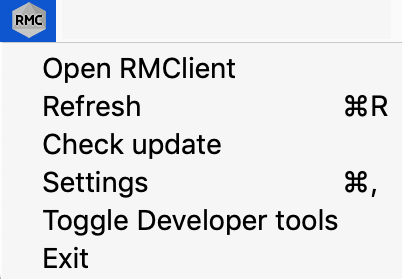
You can also refresh the task list by right-clicking the application icon in the tray and selecting the Refresh option from the menu or applying the CMD+R/Ctrl+R key combination.
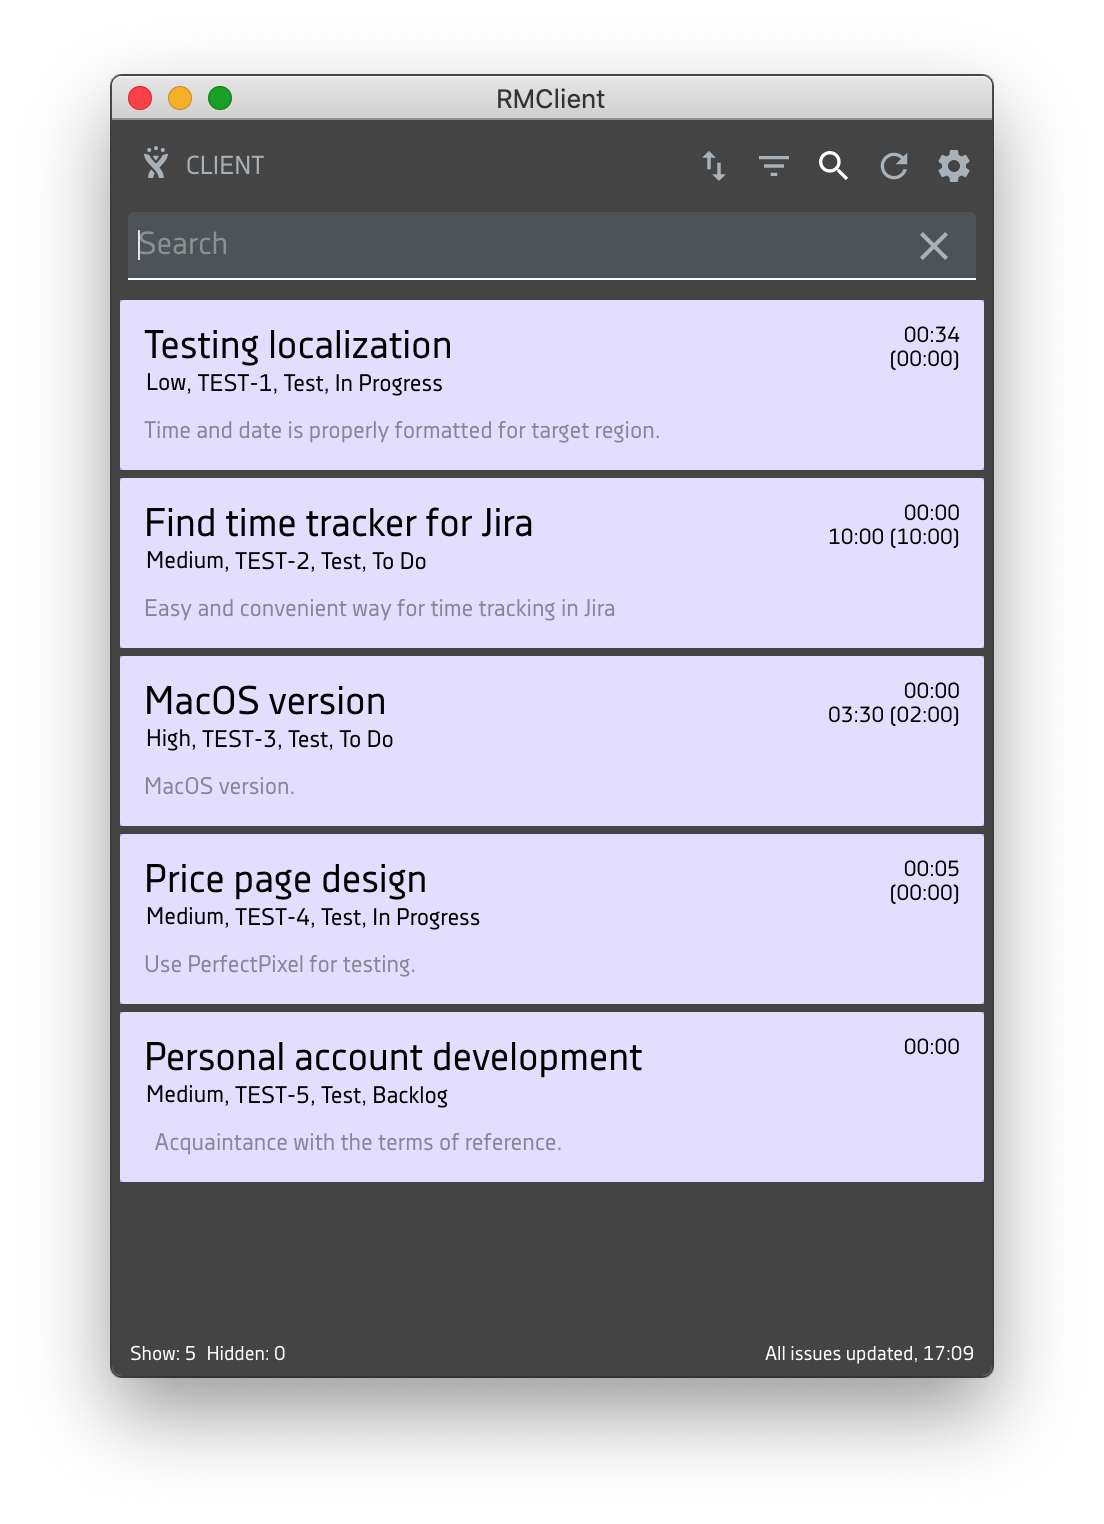
Displays all the tasks you are asked to do like a list.
If the number of tasks is larger than the available screen area, you can scroll up and down the list.
Each Task has a number of attributes, including the color that the task will be highlighted in the common list.
Tasks that belong to the same project are highlighted in a common list of tasks in the same color and sorted according to the priority.
When you hover on a task, the task name and task attributes are highlighted.
The task attributes include:
- Task name,
- Priority,
- Task ID in Jira,
- Project name,
- Task status,
- The first lines of the Task Description,
- Total task time currently spent (displayed in hours, format 00:00)
- Estimate of implementation time - preliminary estimate of the time in which the task will be completed (displayed in minutes, format 00:00).
Note. Depending on the settings of your Jira, the app will reflect the corresponding task attributes. For example, in the case of the blank field of the Description task in Jira, this information will not be reflected.
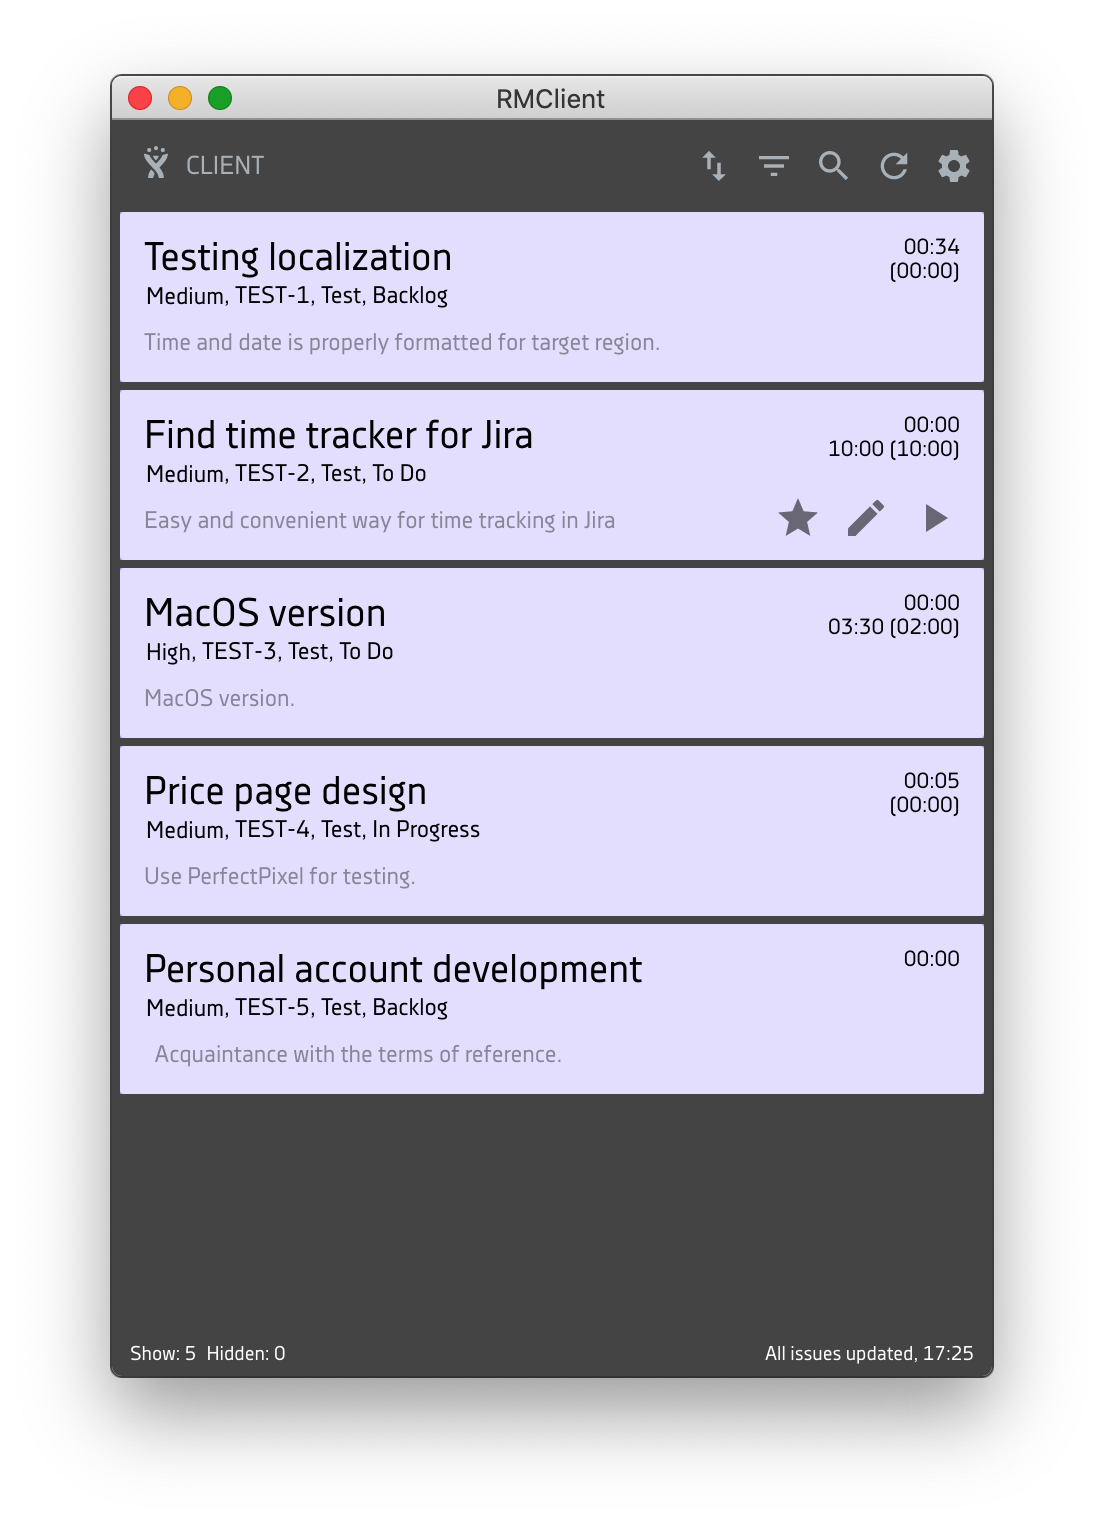
Also, the Favorites, Edit, and Start buttons appear while pointing to the task.
If there are many tasks in the Task List, you can use the Filter and Sort functions to select, sort, and organize tasks by any of the features, such as Project, Task Status, and Task Priority.
An Issue displays:
- Issue name,
- Priority,
- Issue ID in Jira,
- Project name,
- Issue status,
- The first lines of the Issue Description,
- The total time of the task actually spent at the moment (displayed in hours, format 00:00). If the current task has subtasks with a filled field of the actual time spent, then the total time of the task will be displayed in the format of 00:00 (00:00) taking into account the time for the subtask.
- Estimate of implementation time - a preliminary estimate of the time in which the task will be completed (displayed in minutes, format 00:00). If the current task has subtasks with the filled-in time estimation field, then the total time of the task will be displayed in the format 00:00 (00:00) taking into account the time of the subtask.
The Issue name is a link to the task in Jira.
The line below theIssue Name contains the Priority, Issue id in Jira, Project Name, and Issue Status, also a single link to the project issue in Jira.
Note. Depending on the settings of your Jira, the app will reflect the corresponding task attributes. For example, in the case of the blank field of the Description task in Jira, this information will not be reflected.
The new Issuewill appear in your Issue List. If the Filter or Issue Sorting rule is not previously selected, by default each new task will be first in the list. Next, the task will be moved to priority.
When you hover on a Task, the Favorites, Edit, and Start buttons appear.
By clicking the Favorites button, the task is attached to the top of the task list. The Favorite icon appears at the beginning of the line before displaying the Priority of the task.
To start the timeout in the Task, click the Start button. After starting, the Task with the active timer is displayed.

Advanced Settings for the Task
Track the time estimate
You can disable the "Implementation Time Estimate" field in the Track the time estimate Settings.
Recently added
If you have a new task in Redmine, the Recently added icon appears at the beginning of the row before displaying the Task Priority.
![]()
Recently Updated
If the task has recently been updated, the Recently Updated icon appears at the beginning of the line before displaying the Task Priority.
This will mean that there have been changes in the task, for example, the description has changed either the priority or the task has recently written the time spent on the implementation.
You can see the changes in the task by clicking on Task Name or Priority, Task Id, Project Name, Task Status.
![]()
To start the timeout of an issue, press the Play button. After you click the Play button, the issue with the active timer is displayed.
When the Issue is started, its color changes to red and it moves to the first position in the List of Issue.
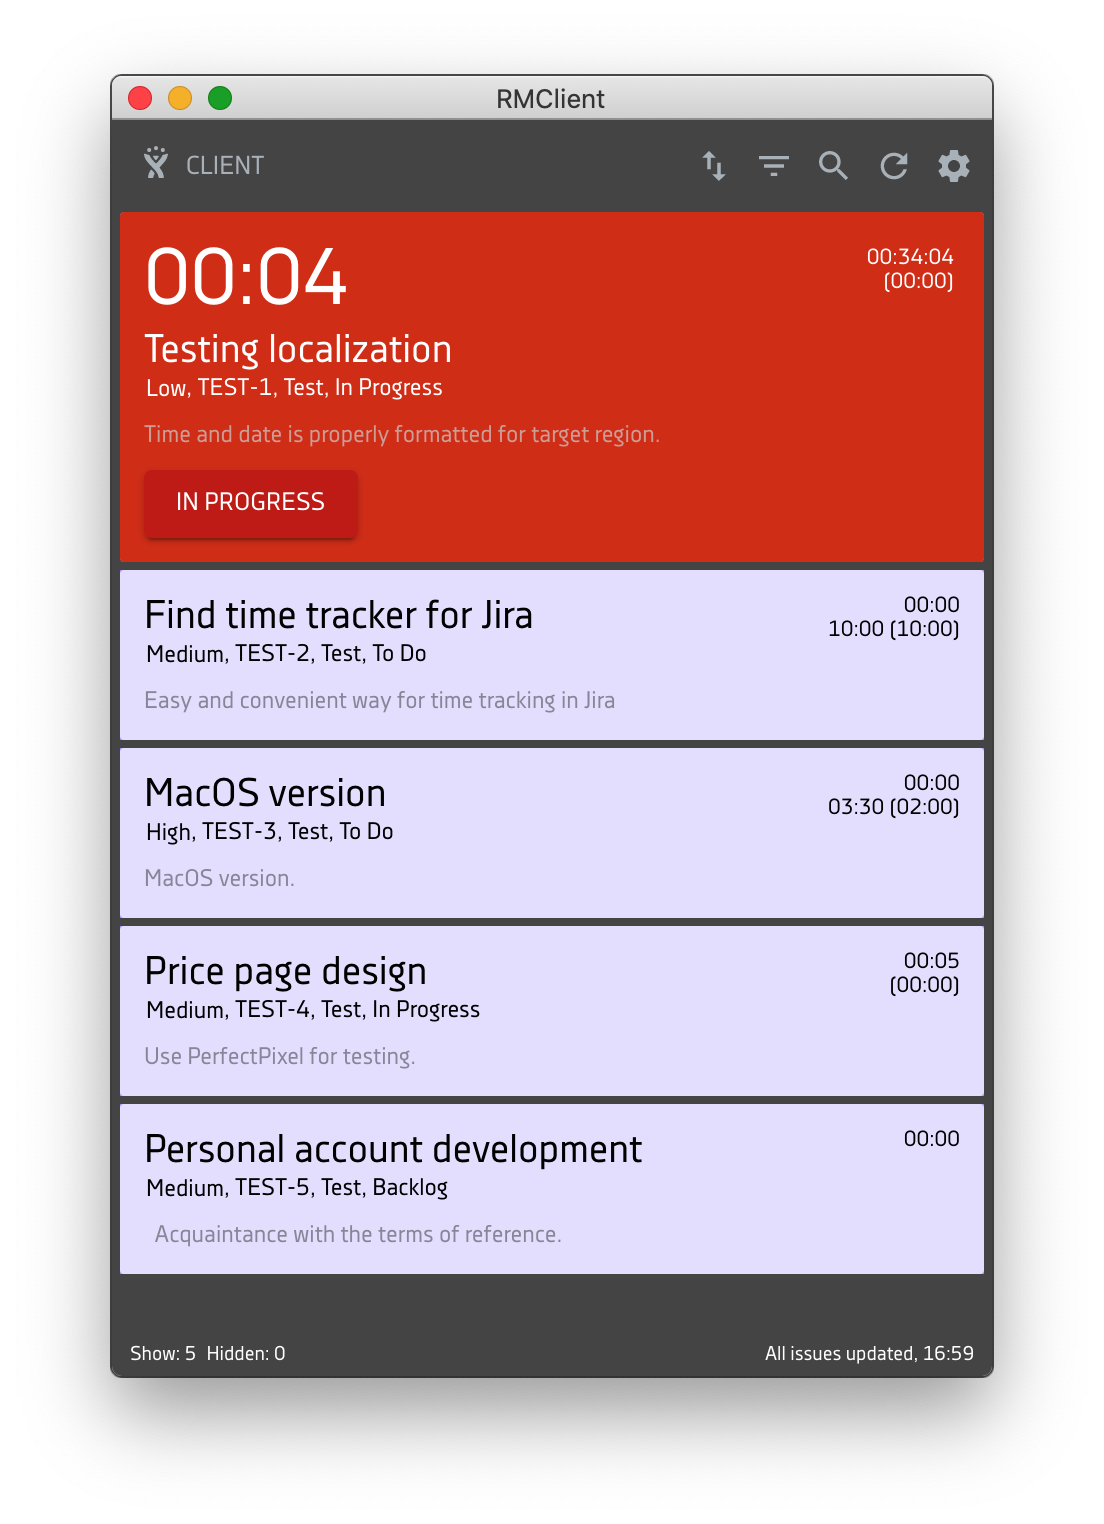
The Issue Name displays the Issue Time Countdown and the Status button appears after the Issue Description lines.
You can change the Status to the appropriate stage by clicking the Status button and selecting the required one. The status change is only available for the issue with the active timer.

When the Status pane is deployed, the Favorites, Edit, and Pause buttons are not available.
When hovering, the Start button is displayed instead of the Pause button. Clicking the Pause button stops the timeout in the Task.
After stopping the timer, the time spent on the task is logged into the Jira task.
After stopping the timer, the task acquires the color obtained when loading the task list and returns to the original position in the list.
By using the function of adding a task to Favorites, you can quickly find important or frequently used tasks.
By clicking the Favorites button, the task is attached to the top of the task list. The Favorite icon appears at the beginning of the line before displaying the Priority of the task.
![]()
When you use Task Sorting or Filter, the Favorites task will always be attached to the top of the task list.
To remove a Task from a Favorites, you must press the Favorites button that appears on the Task again.
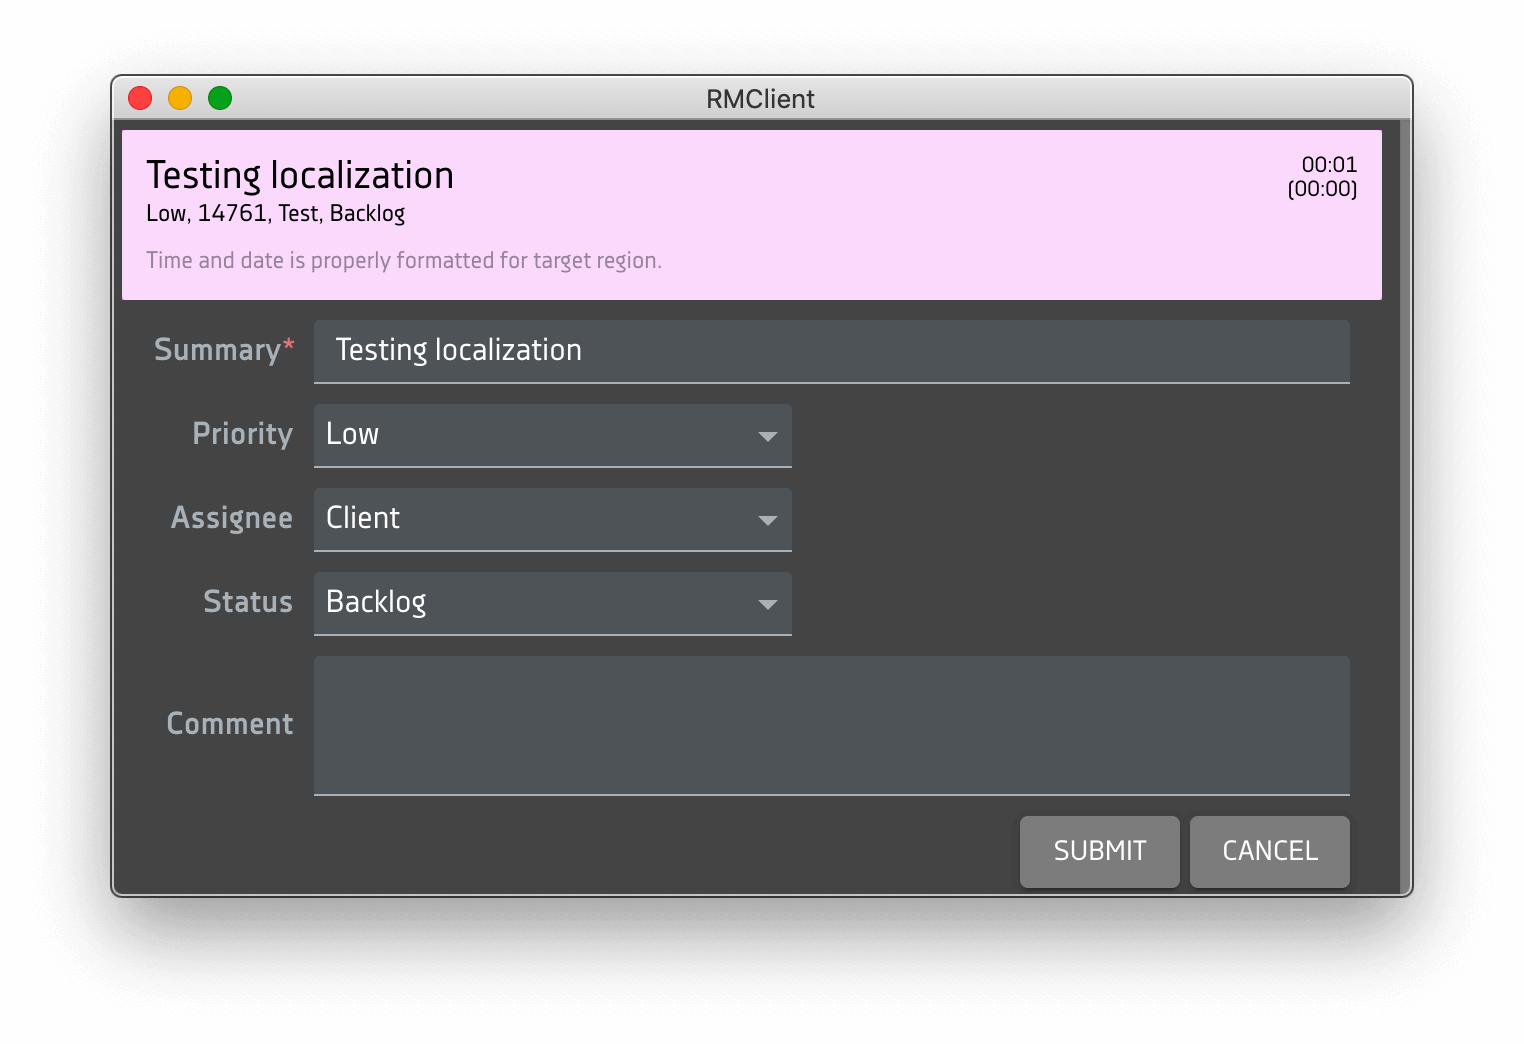
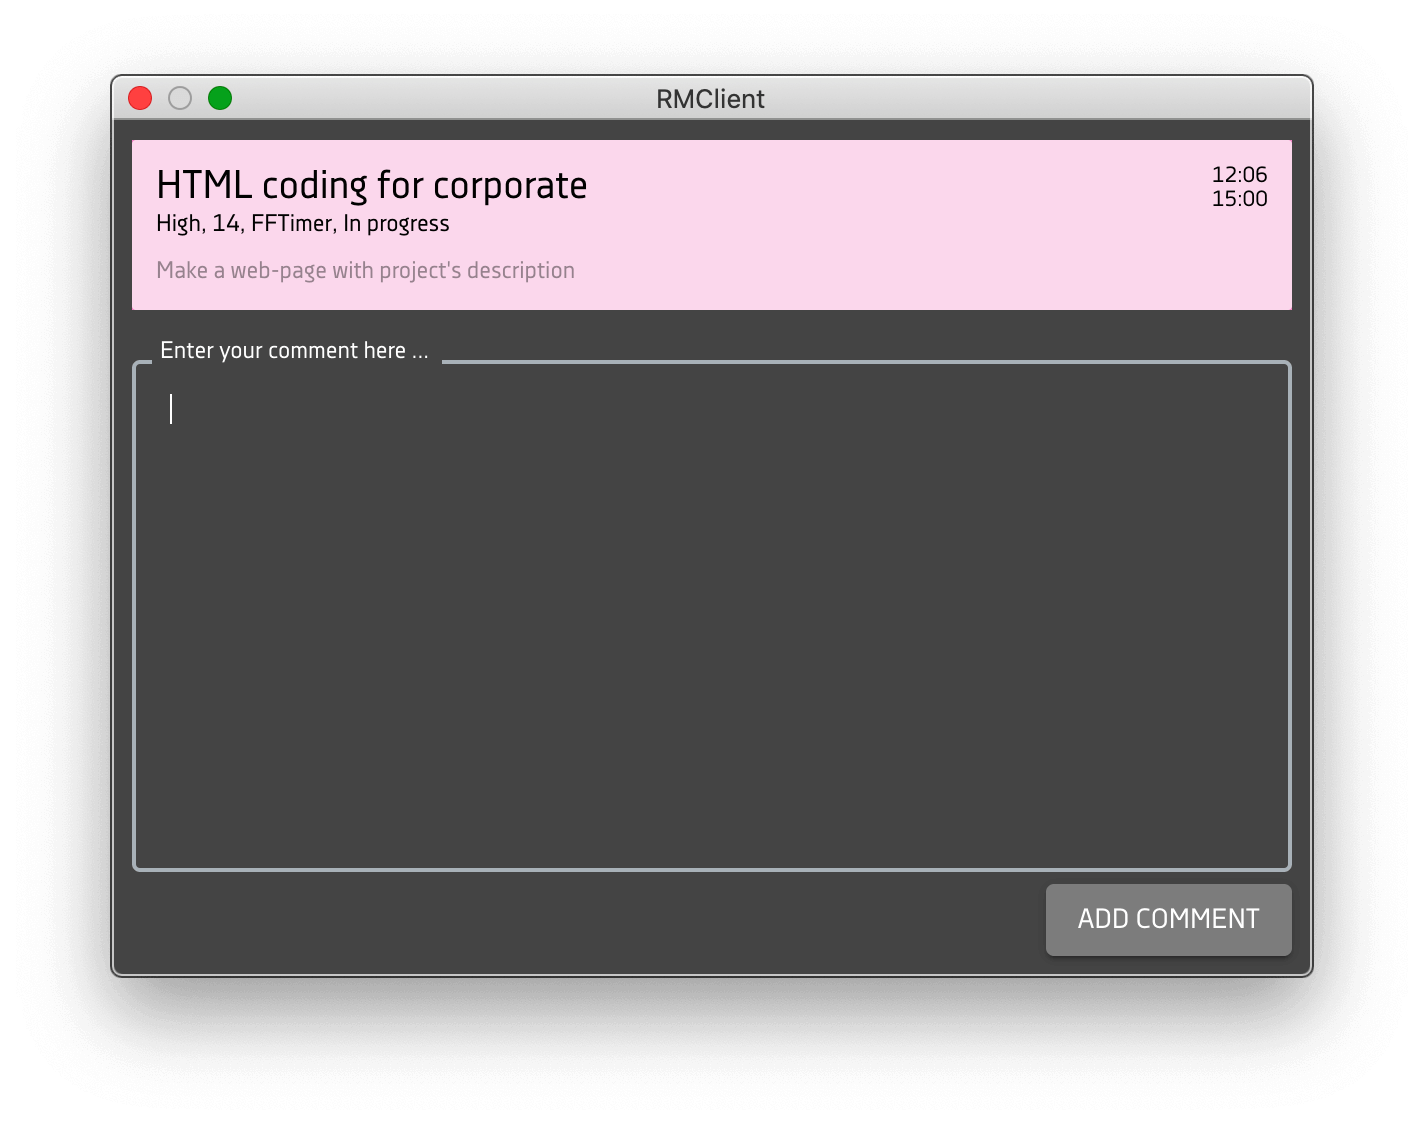
With the Issue Editing feature, you can change the Priority, Task Status, leave a Comment to the task, and move the task to another user without having to log into the web version of Jira.
To open a window, press the Edit button, which appears when hovering over the Issue, both with the active and inactive timer.
The process of editing an Issue with an active timer does not affect the time logging process.
The edit window displays:
- an Issue view (displays information similar to that shown in the Issue List);
- standard fields for the task: Summary, Priority, Assignee, Status;
- additional fields (depending on the settings of your Jira);
- the Comment field to enter a comment to the task;
If necessary, you can switch to the issue in Jira. To do this, click on the Task Name or on the string below the Task Name (Priority, Issue ID in Jira, Project Name and Issue Status). The Issue in Jira will open in a separate window.
To save the change in the fields, press the Submit button. If a mandatory field is empty, an error will appear. Correct it and press Submit again.
To undo the action and close the Edit Issue window, click the Cancel button.

The Leave a comment function is available in the Edit Issue window.
To open the Edit Issue window, click the Edit button, which appears when hovering over the Issue, both with the active and inactive timer.
The process of editing an issue with an active timer does not affect the time logging process.
To leave a comment to the issue you need to:
- Click on the Edit button;
- Write comment text in the Comment field;
- Confirm the action by pressing the Submit button.
To send a comment successfully, the issue must have required fields filled in, if any, in the Jira settings.
Also, if you enable the Reminder to comment the spent time setting in the Settings screen, after stopping the issue timer, a notification window will appear with a comment field.

The list of statuses available in Redmine corresponds to the current Issue and appears after its launch. Allows you to set a variety of activities for the time recorded in the Issue.
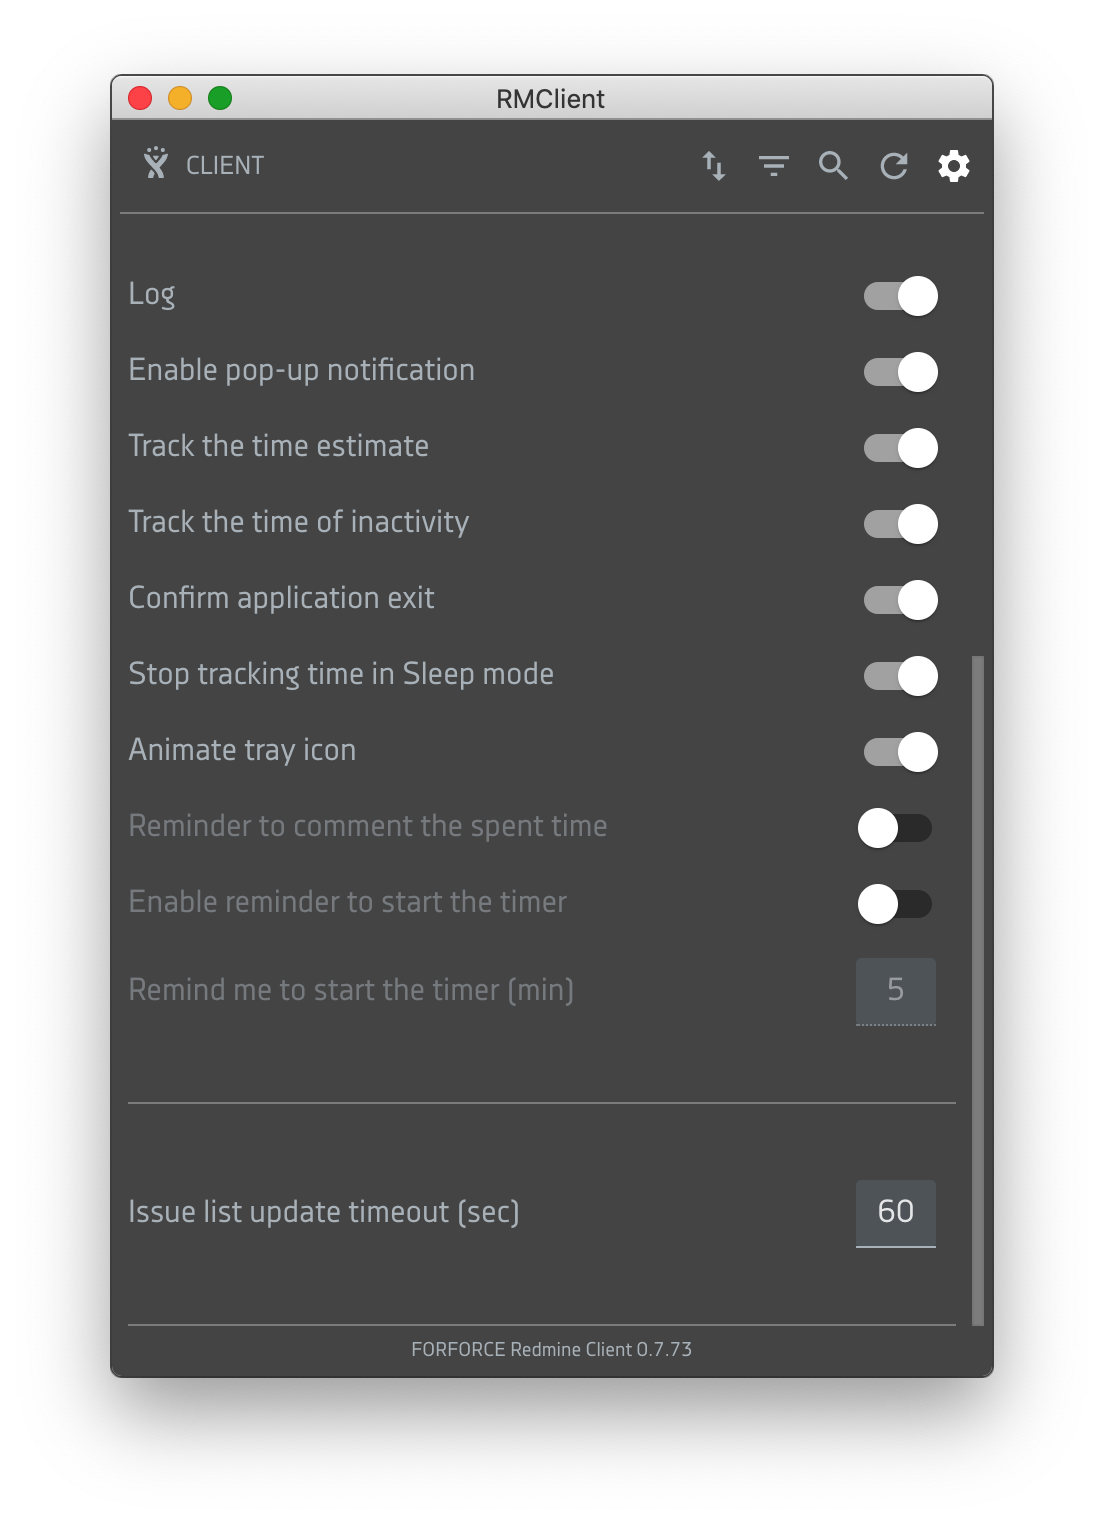
The configuration window allows you to change the state of the custom functions and auxiliary RMClient fields.
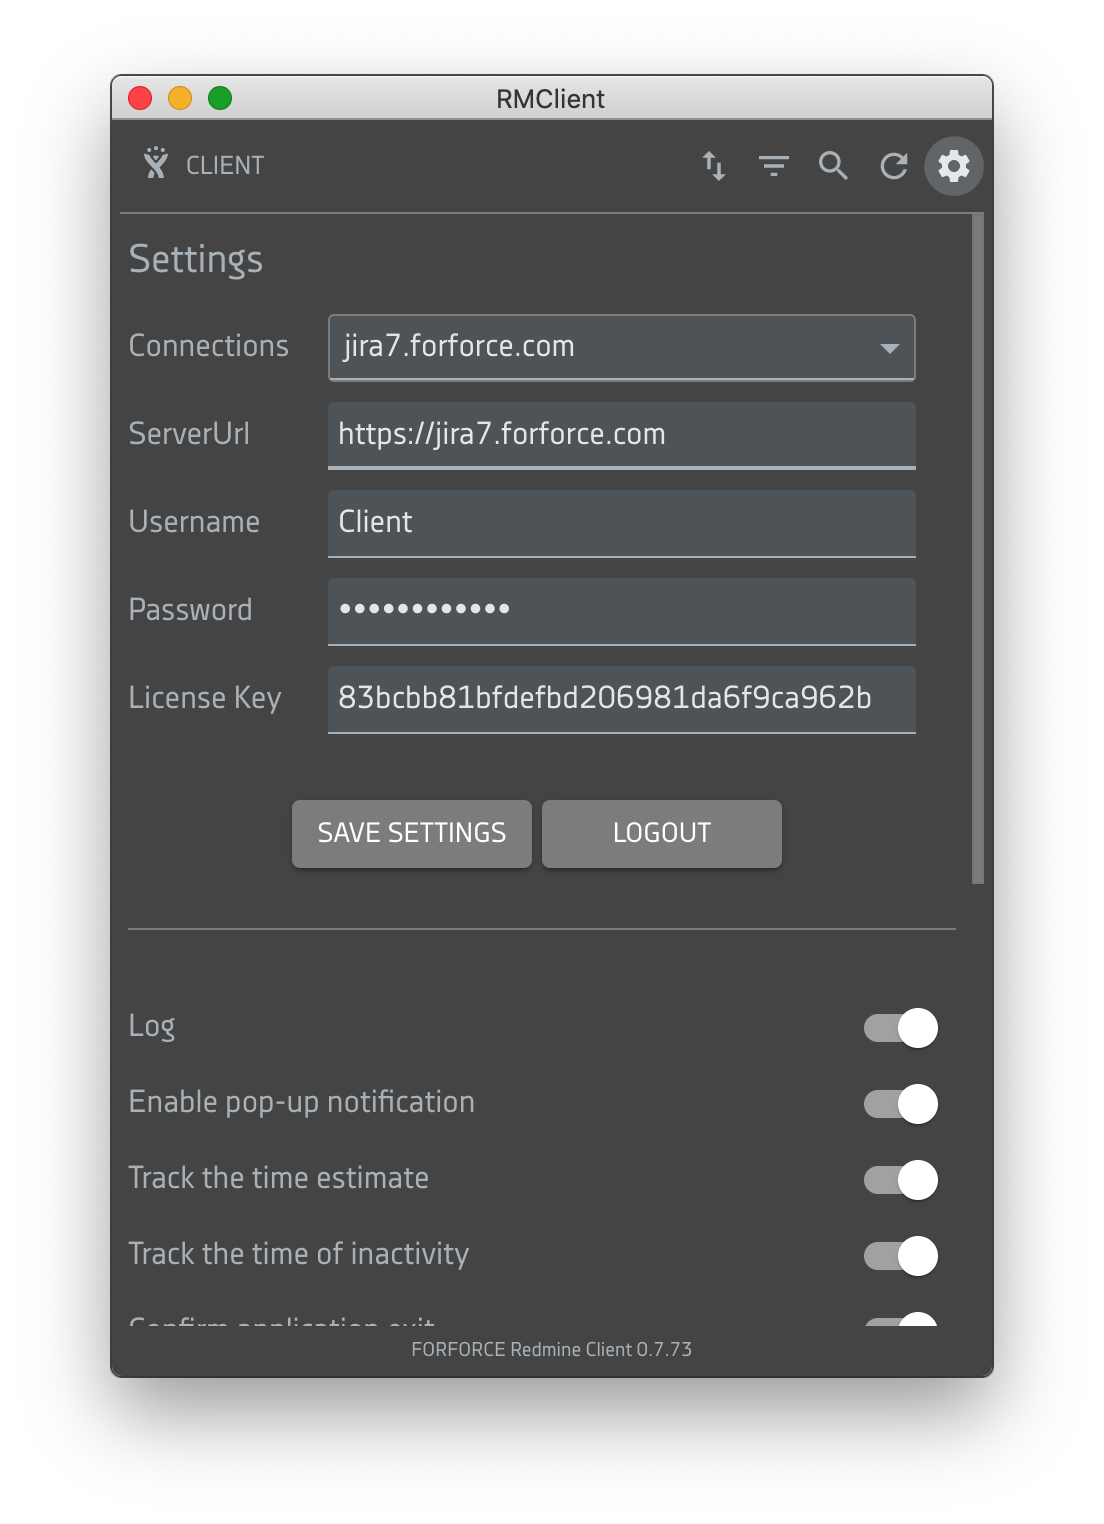
The settings window contains the following fields:
-
Connections - list of connection types
-
Username - user name
-
Resources - a field for selecting a resource name
-
License Key - License Key number. Allows you to use the application after the evaluation period
-
buttons Connect, Log out Jira Cloud, Delete Connection, log out
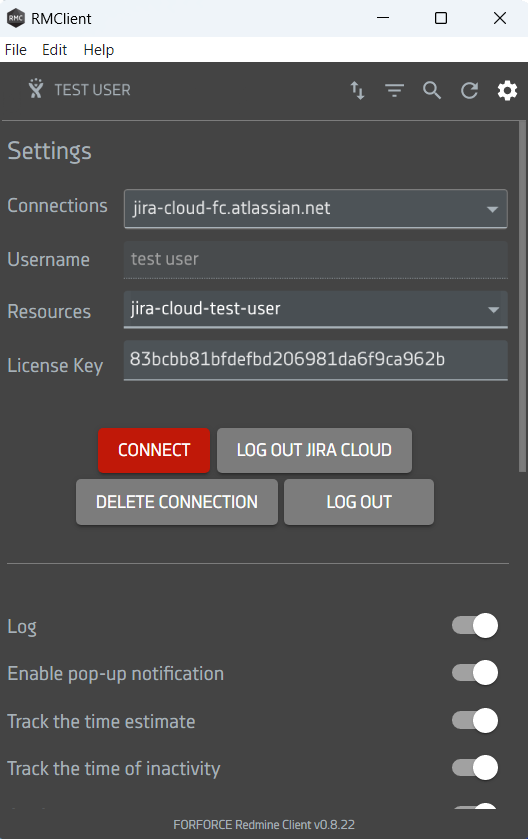
To connect to the current connection, press the Connect button.
After the current connection is set the Settings screen will contain the buttons Save Settings, Log out Jira Cloud, Log out.
To save your changes, click the Save settings button.
To exit the Jira Cloud connection and delete the user data, press the Log out Jira Cloud button, and the Login screen will open.
To exit the current connection, press the Log out button, and then the login screen with pre-filled fields of connection settings will open.
You can also invoke the Open/Close Preferences function by right-clicking the tray menu application icon and selecting the Settings option from the menu.
The settings screen allows you to create a new connection and log in to the application.
Create a new connection with authorization in Jira Cloud
To create a new connection, you must:
- Select the New connections connection type in the Connections box

- The Username field opens an authorization window by clicking the Log in button.
- You must select a resource in the Authorize for authorization window.
- After clicking the Accept button, the authorization window is closed and the Username and Resources fields are automatically filled with user data.
- You need to fill in the License Key field.
- To confirm the action, click Connect.
The Save settings and Log out buttons allow you to apply changes to your settings or undo them, respectively.
If the connection data has been entered correctly, after clicking on Save settings, you will be able to access the Home Screen.
Note. When you click the Save settings button, the server is reconnected, which causes the task list to be updated and the timeout to be disabled in the Task with the active timer.
You must press Log out to exit the current connection.
The Log out button will be available for an unconnected connection type. During the current connection type, the Save settings and Log out buttons will be available to the User.
To exit the Jira Cloud connection and delete the user data, press Log out Jira Cloud.
The Log setup activates the logging of technical information that will help us troubleshoot or configure RMClient. By default, active.
How do I enable or disable the logging of technical information?
You can enable and disable technical information logging in the Log Settings.
Open the Settings Screen app. Then click on Log or switch «Allow Notification» to «On» position. This will change the color of the switch from black to gray. Now the Log setting is activated.
In the same way, you can disable the setting by changing the switch position to "Off".
Activates pop-up notifications when new tasks are received.
If you are assigned a new task, you can quickly view the contents of the pop-up notification window in the bottom right corner of the screen. By default, active.
You will also receive a notification if you have an Active Timer Task running.
Clicking on the notification of a new task brings the application into focus.
How do I enable or disable pop notifications?
You can enable and disable the pop-up notification window in the Enable pop-up notification settings.
Open the Settings screen application. At the bottom of the window, select the Enable pop-up notification setting.
Then click on Enable pop-up notification or switch «Allow notification» to «On.» This will change the color of the switch from black to gray. Now you will receive notifications about a new task.
Similarly, you will no longer be notified about this app by changing the switch position to "Off."
Recently added
If you are assigned a new task in Jira, the Recently added icon appears at the beginning of the row before displaying the Task Priority.
![]()
The enabled Track the time estimate setting activates the Task Time Estimate display and helps the Task Task Task Task Task Task Task Task Task Task Task Task Task Timeline monitor.
If the task provides a preliminary estimate of the implementation time, this value is inferred from the time already spent on the task list.
When the implementation time estimate is reached, a pop-up alert is displayed. By default, it is inactive.
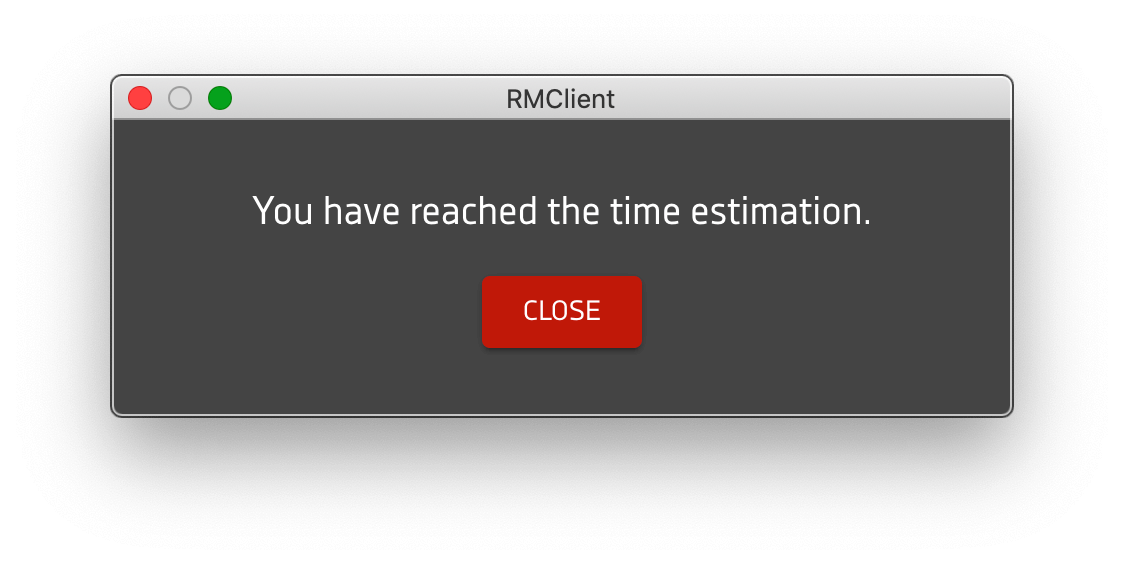
How do I enable or disable the Task Run Time Evaluation notification?
You can enable and disable a pop-up notification window to alert you when the target implementation time is estimated in the Track the time estimate Settings.
Open the Settings screen application. At the bottom of the window, select the Track the time estimate Setting.
Then click on Track the time estimate or switch «Allow notification» to «On» The color of the switch will change from black to gray. Now the Track the time estimate setting is activated.
You can also disable Track the time estimate by changing the switch position to "Off"
The Track the time of inactivity feature is enabled to track the Account activity period and the period of its inactivity in the application, for example when the User has long left the computer and forgot to pause the timer.
During a period of inactivity, the Track the time of inactivity feature will pause the task timer and a new countdown will begin during a period of inactivity. When the Account activity resumes, the application will display a dialog box with options for time-out. By default, the dialog box will open after 5 minutes of inactivity in the application.
When the Account activity resumes, the application will display a dialog box with options for time-out.
The user should choose the appropriate option from the following:
- write inactivity to the current task
- send to another task from the list of tasks
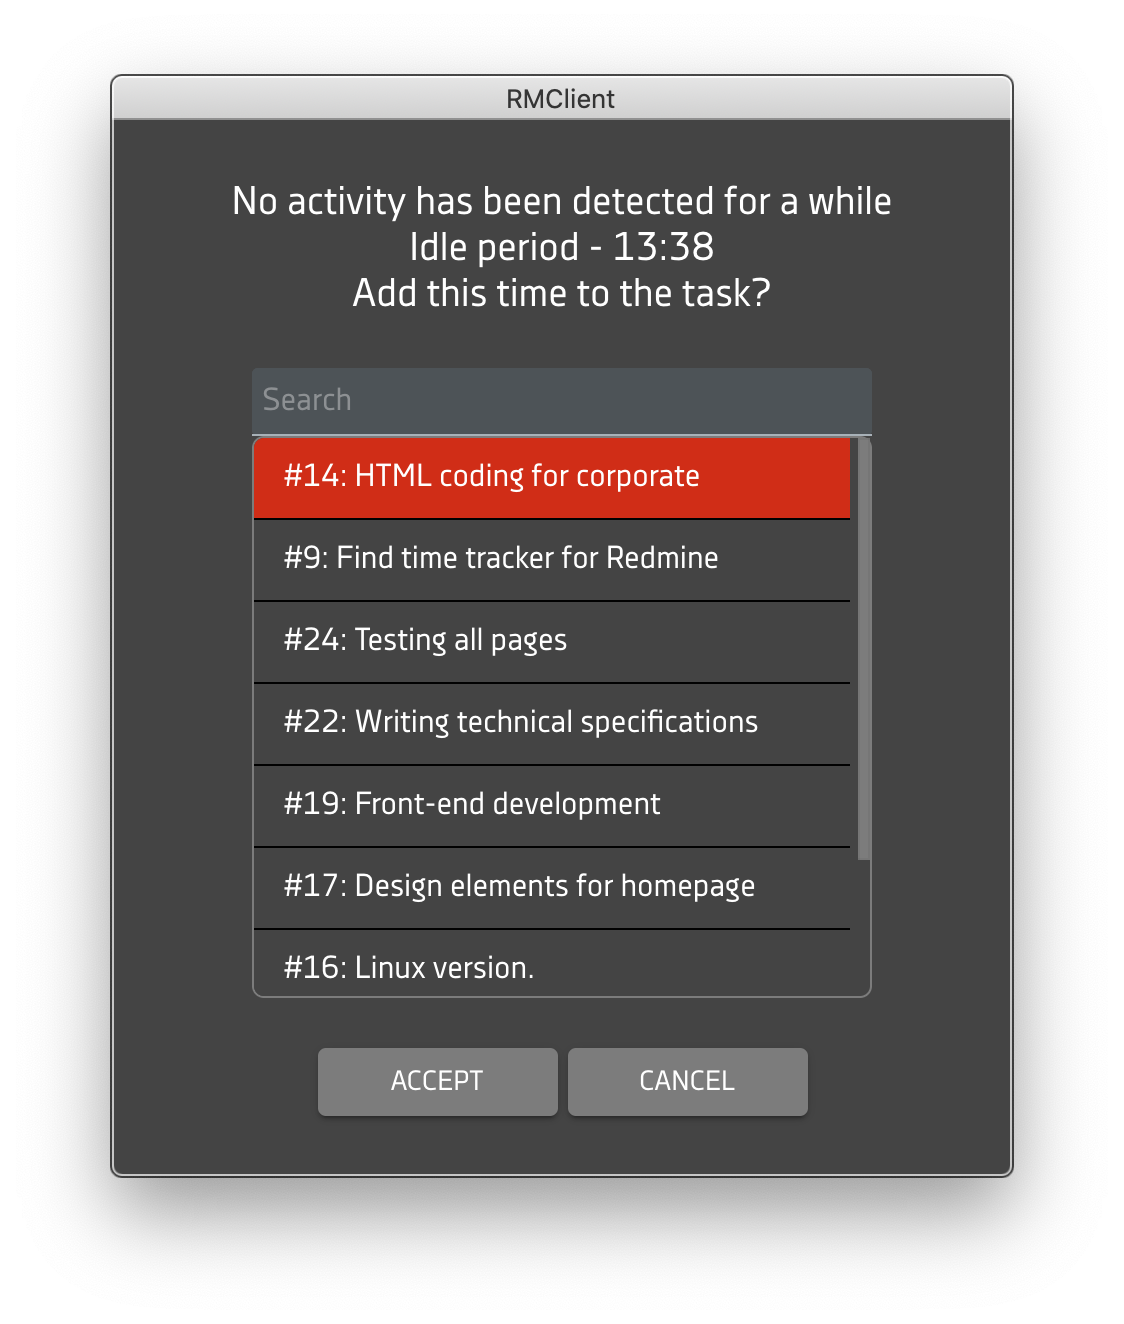
How do I take the time of inactivity into account in the current task?
The current task is displayed first in the task list.
In order for the time to be taken into account in the current task, you must select the current task and confirm the action by clicking on the Continue tracking button.
How can we take into account the time of the inactivity period in another task from the proposed list?
The search box makes it easier to find the task you need to take into account the time of inactivity.
If the number of tasks is larger than the available screen area, you can scroll up and down the list.
If you select another task for time accounting, the Continue tracking button is replaced with the Add spent time and stop tracking button. In this case, the time of the inactivity period will be taken into account in the selected task.
The active task timer will be stopped and the time spent on the task will be recorded.
Clicking on the Cancel button confirms the reset of the inactivity timer.
How do I enable or disable the Account inactivity period notification in an application?
You can enable and disable Track the time of inactivity Settings to display the inactivity period notification popup window in the application.
Open the Settings screen in the app. At the bottom of the window, select Track the time of inactivity.
Then click on Track the time of inactivity or switch «Allow notification» to «On» This will change the color of the switch from black to gray. Track the time of inactivity is now activated.
You can also disable Track the time of inactivity by changing the switch to "Off"
Activates pop-up output with confirmation when you exit the application. By default, active.
How do I enable or disable the pop-up with confirmation when I log out?
You can enable and disable the pop-up confirmation in the Confirm application exit Settings.
Open the Settings Screen app. At the bottom of the window, select the Confirm application exit setting.
Then click on Confirm application exit or switch «Allow notification» to «On» The color of the switch will change from black to gray. Now the Confirm application exit setting is activated.
In the same way you can disable the Confirm application exit setting by changing the switch position to "Off"
Setting Stop tracking time in Sleep mode allows you to stop the task timer when your PC has entered sleep mode, and without losing data record the time spent on the task in Jira.
How do I turn on or off the timer stop function when your PC has entered sleep mode?
You can set the timer to stop when your PC is in sleep mode by turning it on and off in the Stop tracking time in Sleep mode Settings.
Open the Settings Screen app. At the bottom of the window, select the Stop tracking time in Sleep mode setting.
Then click on Stop tracking time in Sleep mode or switch «Allow notification» to «On.» The color of the switch will change from black to gray. Now the Stop tracking time in Sleep mode setting is activated.
Similarly, you can disable the Stop tracking time in Sleep mode setting by changing the switch position to "Off."
Activates the animated notification function when new tasks are received.
If you are assigned a new task, a flashing digit will be shown on the RMC icon in the lower right corner of the screen. The digit shows the number of new tasks.
You will also receive a notification if you have an Active Timer Task running.
Clicking on the notification of a new task brings the application into focus.

How do I enable or disable the animated notification when I receive new tasks?
You can enable and disable an animated notification when you receive new tasks in the Animate tray icon Settings.
Open the Settings screen application. At the bottom of the window, select the Animate tray icon setting.
Then click on the Animate tray icon or switch «Allow notification» to «On.» This will change the color of the switch from black to gray. Now you will receive an animated notification about the new task.
Similarly, you will no longer be notified about this app by changing the switch position to "Off."
After stopping the timer activates the pop-up output with the comment field for the time spent on the task. By default, active.
After adding a comment, confirm the action by pressing the Add comment button.
How do I enable or disable pop-up output with a comment field to the time taken to complete the task?
You can enable and disable the pop-up notification window in the Reminder to comment the spent time Settings.
Open the Settings Screen app. At the bottom of the window, select Reminder to comment the spent time.
Then click on Reminder to comment the spent time or switch «Allow notification» to «On.» The color of the switch will change from black to gray. Reminder to comment the spent time is now activated.
You can also disable Reminder to comment the spent time by changing the switch to "Off."
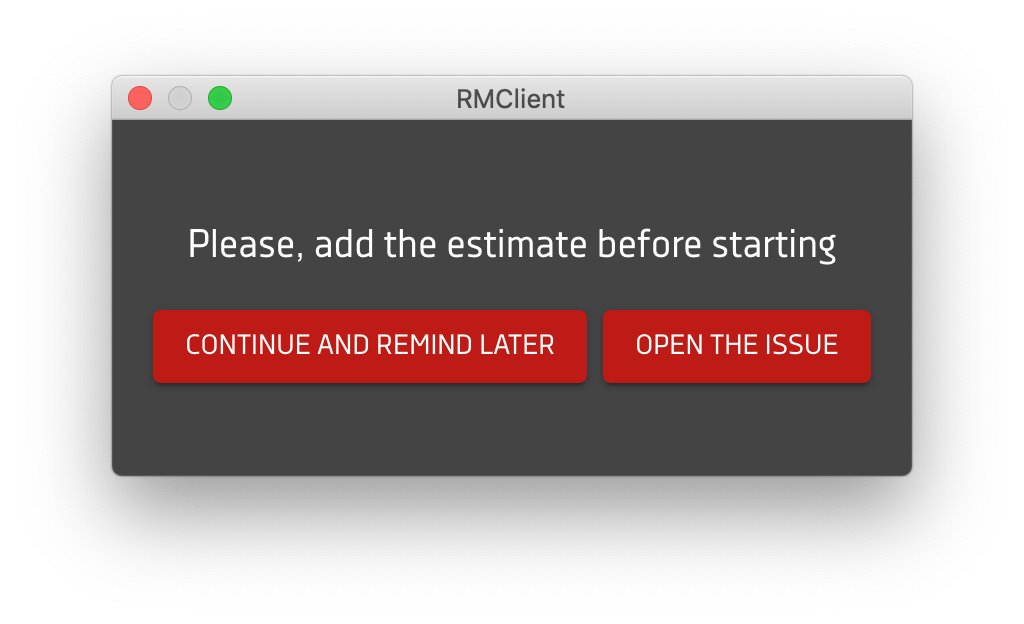
The included Remind to estimate the issue setting activates the display of a notification with a reminder to set a preliminary time estimate for a task and helps the Task Performer control the time frame for completing a task.
For tasks with a timer enabled, for which Jira does not set a preliminary time estimate (original estimate), a pop-up notification Please, add the estimate before starting with the Continue and remind later and Open the issue buttons will appear. Clicking the Open the issue button allows you to open a task in the browser to edit it.
To continue working on the task and display a notification with a reminder later, you need to click the Continue and remind later button.
How to enable or disable the notification of Remind to estimate the issue?
The appearance of a pop-up notification window reminding you to add a preliminary assessment of the task can be enabled and disabled in the Track the time estimate Settings.
Open the Settings screen in the app. At the bottom of the window, select the Remind to estimate the issue setting.
Then click on Remind to estimate the issue or move the "Allow notification" switch to the "On" position, which will change the color of the switch from black to gray. The Remind to estimate the issue setting is now activated.
Similarly, you can disable the Remind to estimate the issue setting by changing the position of the switch to "Off."
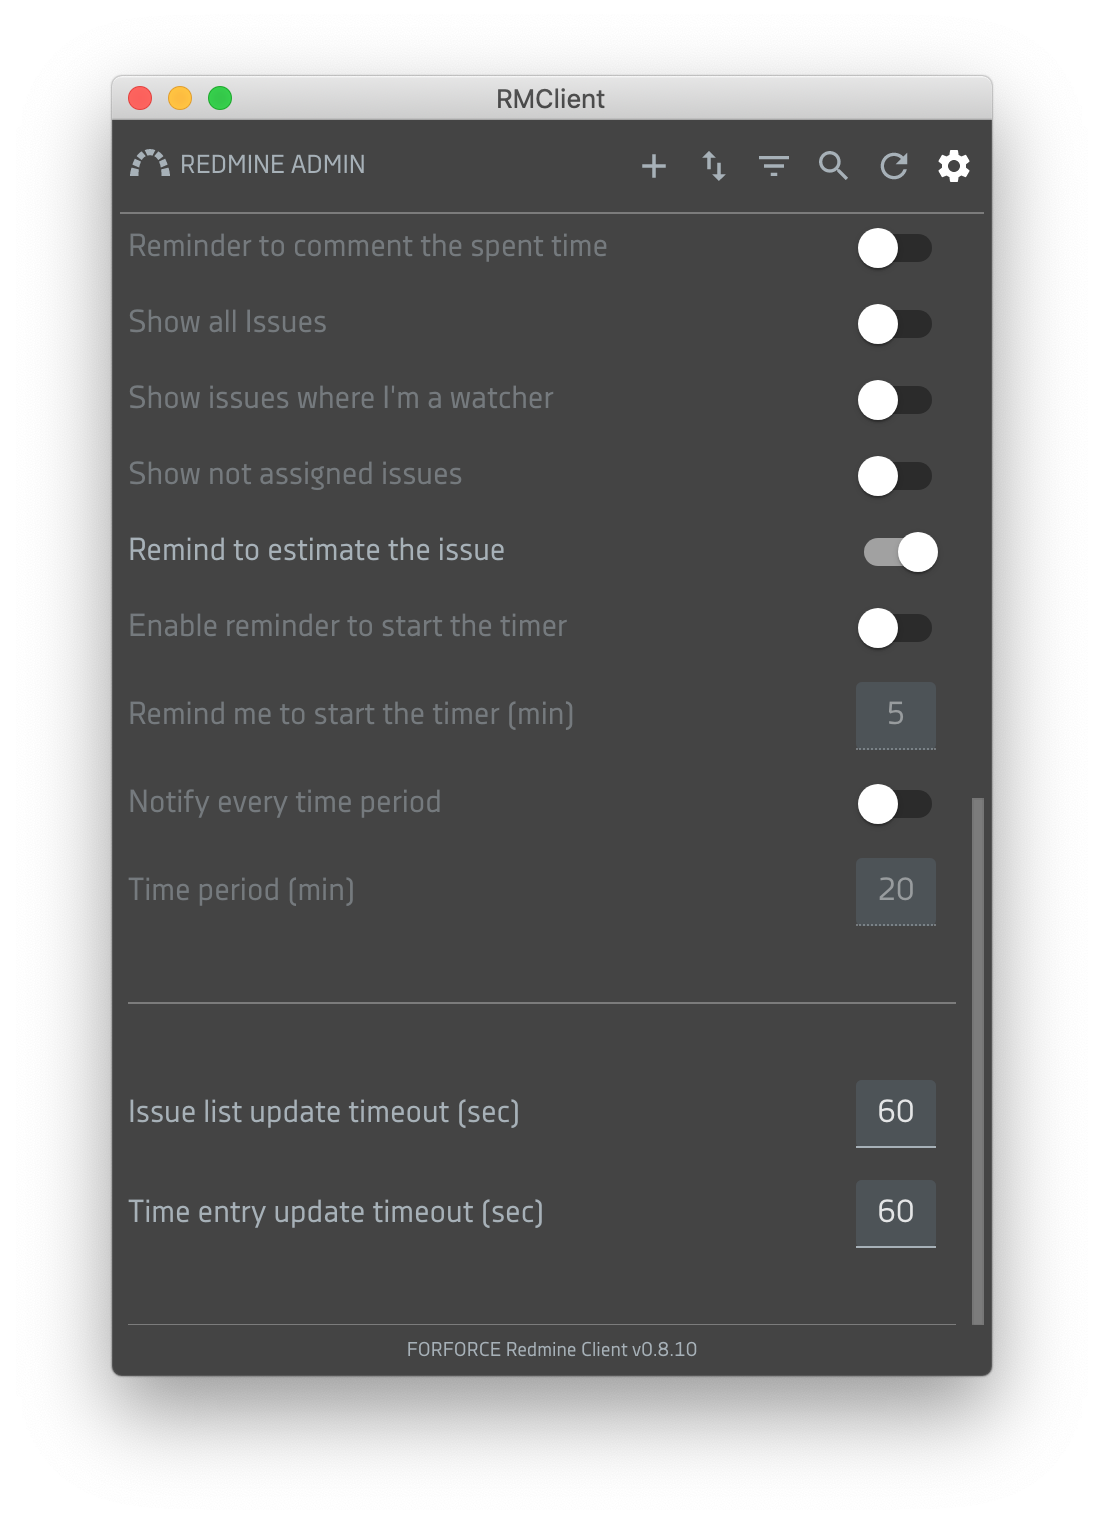
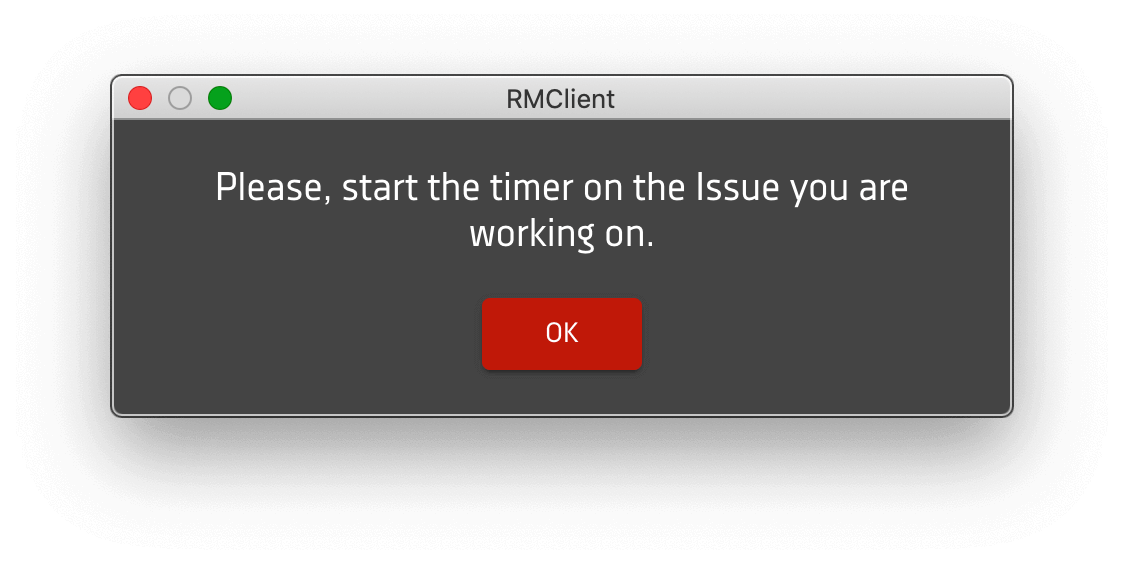
The Enable reminder to start the timer setting triggers a reminder that the timer is not running, highlighting the need to continue with the tasks in the Tasks list.
The pop-up notification will appear after the time you specified in the Remind me to start the timer field.
How do I enable or disable a reminder that the timer is not running?
You can activate and deactivate the Enable reminder to start the timer by popping up a notification window to remind you that the timer is not running.
Open the Settings screen application. At the bottom of the window, select the Enable reminder to start the timer setting.
Then click on Enable reminder to start the timer or switch «Allow notification» to «On.» This will change the color of the switch from black to gray. Enable reminder to start the timer is now enabled.
You can also disable the Enable reminder to start the timer setting by changing the switch position to "Off."
In the Remind me to start the timer box, you must specify the time in minutes after which you want to send a reminder to the Account when there is no task with the active timer.
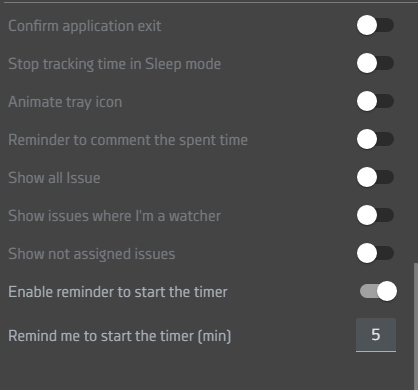
The time interval after which the reminder will appear to start the timeout in the task. The minimum value is 5 minutes.
Notify every time period function allows you to set a timer to monitor the time used for the current task and activates the display of reminders about the amount of time used for the task after a specified period of time.
The pop-up notification will appear after the time you specified in the Time period (min) field. By default, the Time period (min) field is set to 20 minutes.
How do I enable or disable the reminder about the amount of time used for the current task?
The appearance of a pop-up notification window with a reminder of the amount of time used for the task can be enabled and disabled in the Notify every time period settings.
Open the Settings screen in the app. At the bottom of the window, select the Notify every time period function.
Then click on Notify every time period or move the "Allow notification" switch to the "On" position This will change the color of the switch from black to gray. The Notify every time period function is now activated.
Similarly, you can disable the Notify every time period function by changing the position of the switch to "Off."
In the Time period (min) field, you must specify the time in minutes after which you want to display a reminder for the User if there is no task with an active timer.
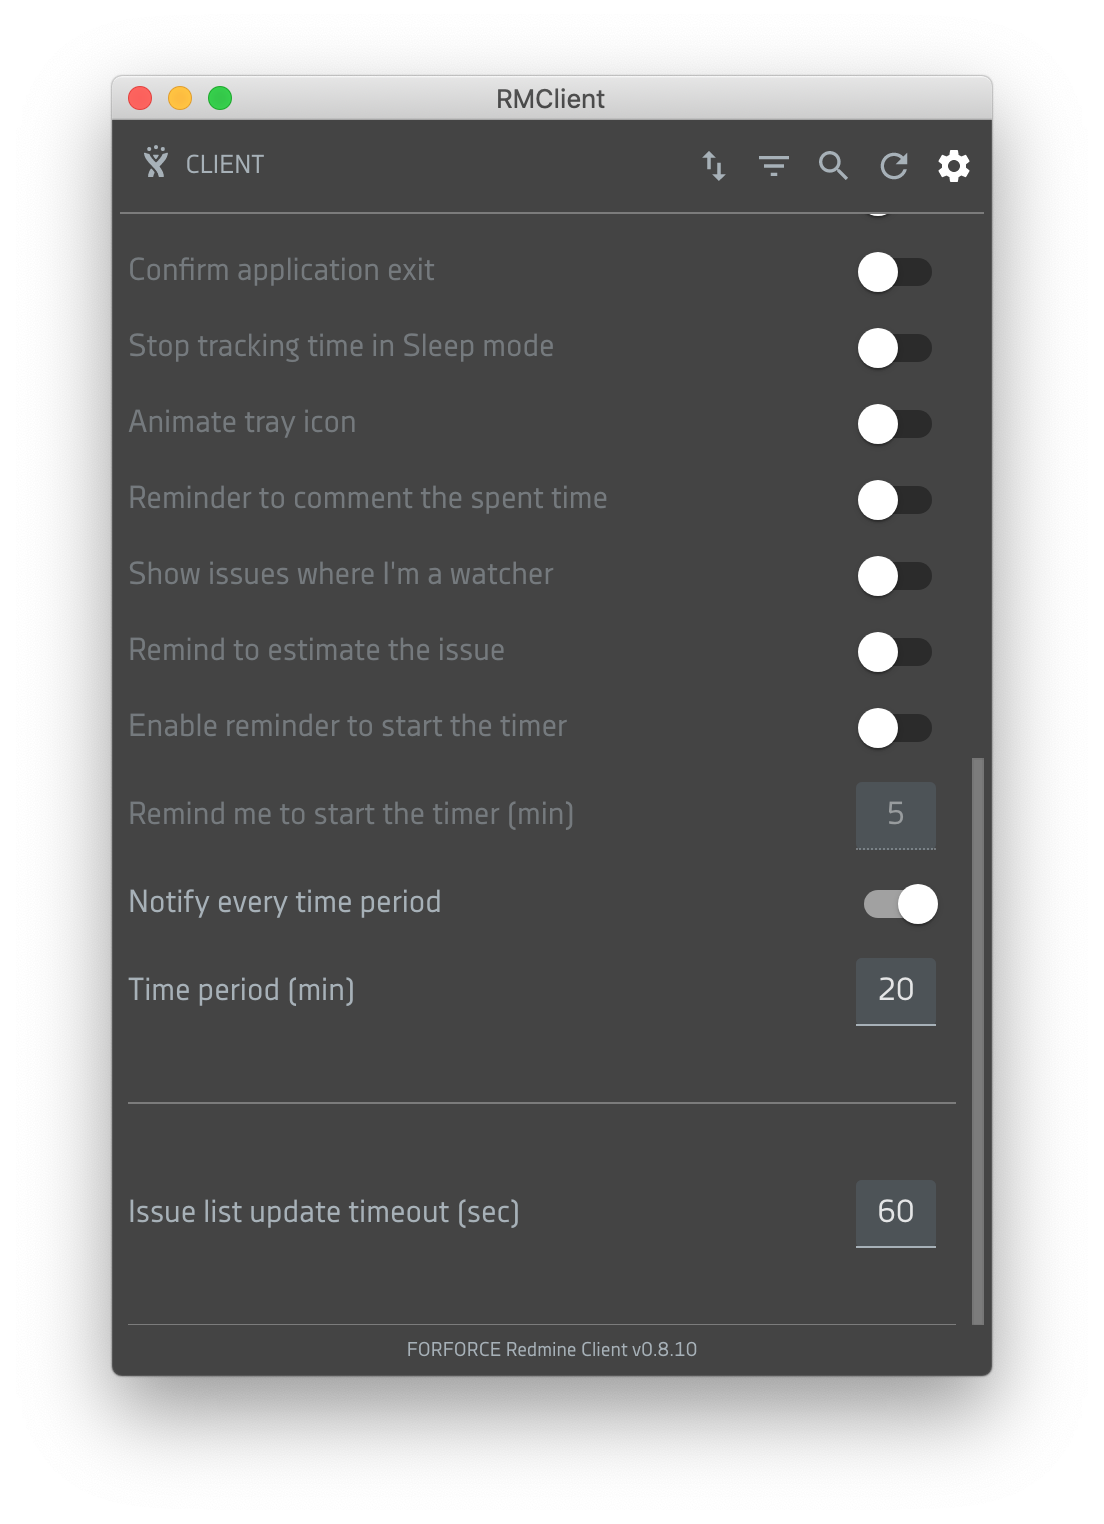
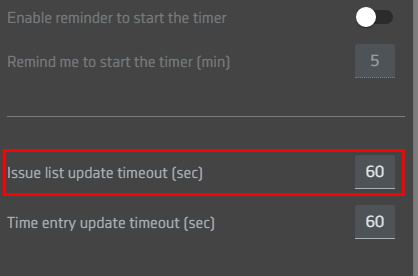
Allows you to set the synchronization frequency with the server to receive new tasks. The minimum interval is 60 seconds.
If you are unable to solve the problem, you can turn on logging in the client settings by checking the «Log» box.
Now, all of your activities will be written to a text file, which can be found in «My Documents» folder — «RMClient».
You can send us the log to support@rmclient.org, and we will help you to resolve the problem.
If the time is not written to the current task, a dialog box with time management options will be displayed.
The user should choose the appropriate option from the following:
- continue counting the current task
- write time to the current task
- deregister
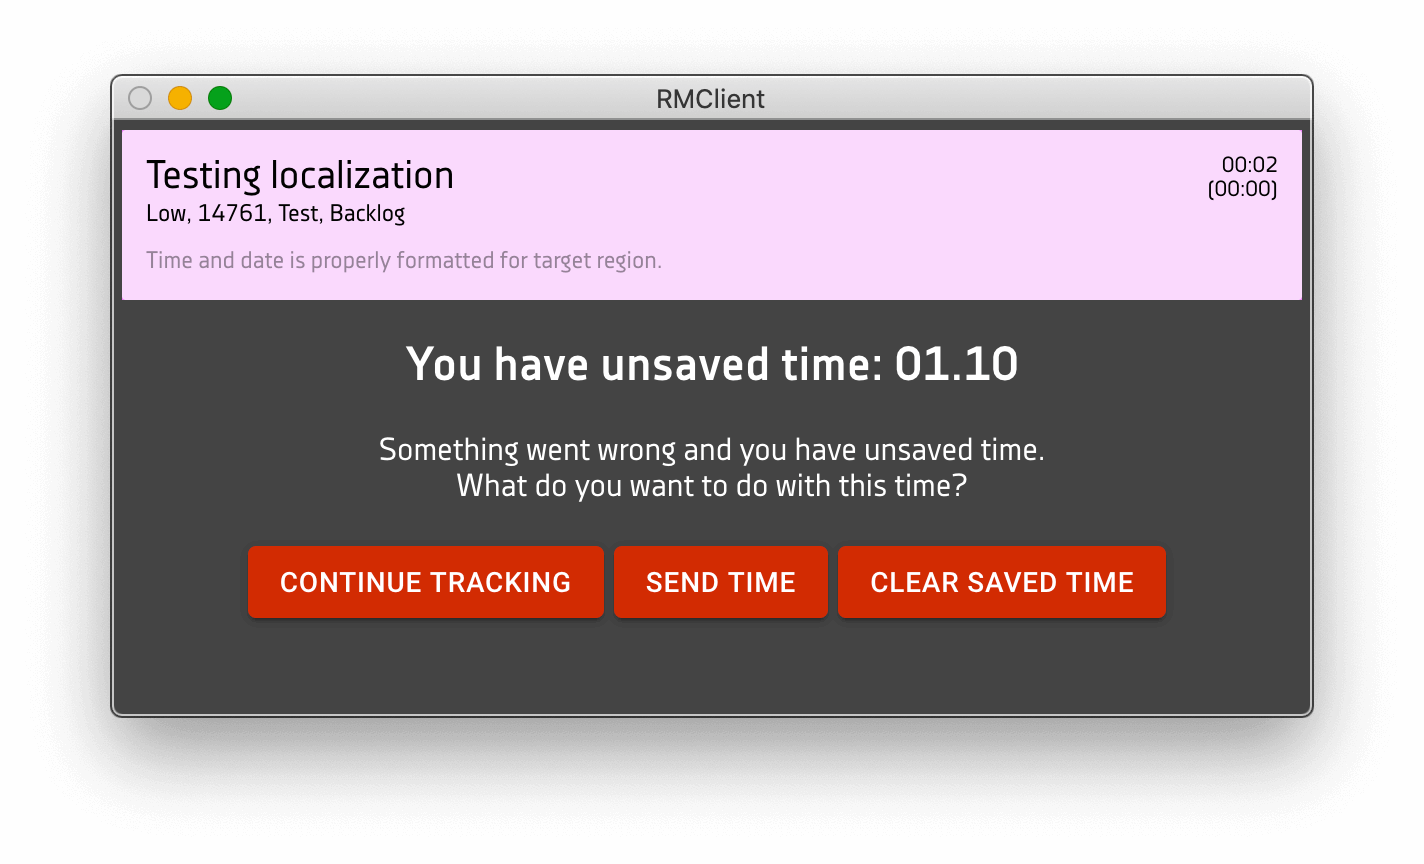
This situation may arise in the following cases:
- internet blackout
- problems on the Redmine/Jira client server
- emergency power outage
To get a license key please:
1. follow the link «Purchase a license» and choose the most suitable pricing;
2. fill in a form;
3. make a payment in any convenient way for you: by Credit/Debit card, PayPal, etc.
After the payment is confirmed, you will receive a License Key. Please enter the key into the required field in RMClient.
License Key allows you to use RMClient after trial period has expired. Get a license right now.
When purchasing a license you are able to choose the most advantageous price.
You get 10% or 20% off when purchasing 10−20 or 21−50 licenses accordingly. Learn more about RMClient pricing.
Please send an e-mail to support@rmclient.com or fill in a form.
Please indicate your Order ID so that we can respond to your request quickly and effectively.
We regularly hold promotions and distribution of promo-codes. Follow us on Facebook or subscribe to our Newsletter and don't miss a special offer!
After installing RMClient, you can use the application for free for 30 days to familiarize yourself with its main functions and capabilities.
At the end of the trial period, a dialog box will appear with a message about the possibility of purchasing a licensed version of the application.
Opens or closes Application Settings.
For macOS, you must press the CMD+comma key combination.
For Windows, Linux must press the Ctrl+comma key combination.
Pressing the shortcut again closes the App Settings.
You can also call the Open/Close Preferences function by right-clicking the application icon in the tray menu and selecting the Settings option from the menu.

Opens or closes the Search pane.
To open the Search panel, macOS requires pressing the CMD+S key combination
For Windows, Linux must press the Ctrl+S key combination
Pressing the shortcut again closes the Search pane.
Opens the Filters pane.
For macOS, press the CMD+F key combination
For Windows, Linux must press the Ctrl+F key combination
Pressing the shortcut again closes the Filters panel.
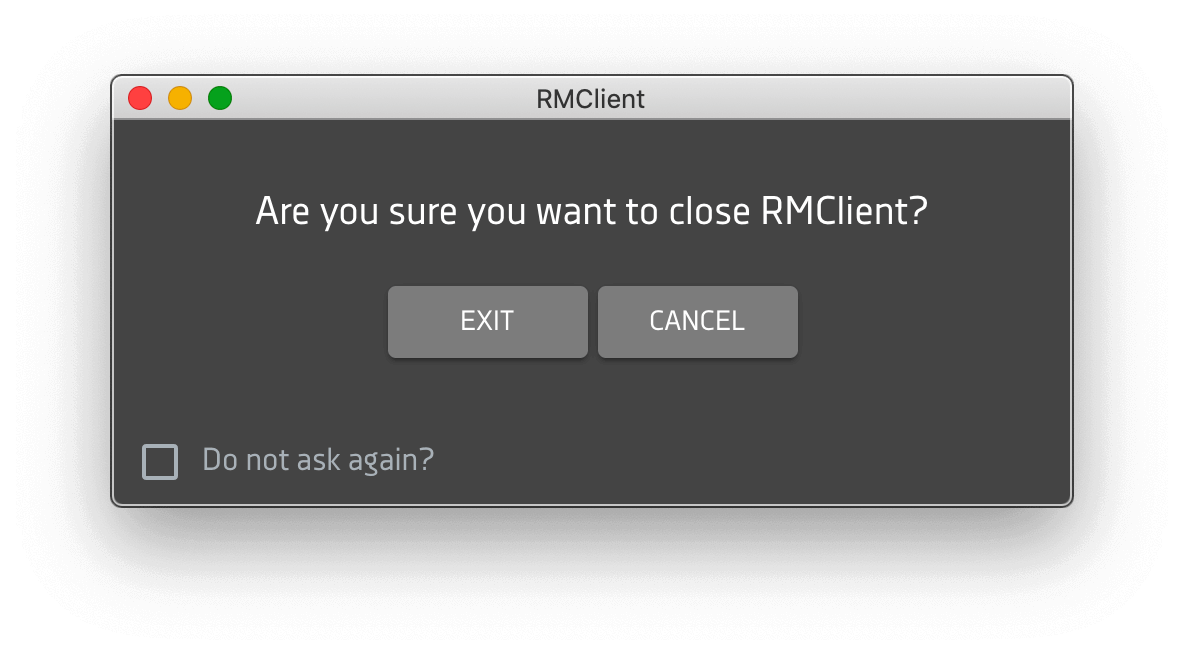
Stops the application from running.
For macOS, press the CMD+Q key combination
For Windows, Linux must press the Ctrl+Q key combination
You can also complete the application by right-clicking the application icon in the tray menu and selecting the Exit option from the menu.
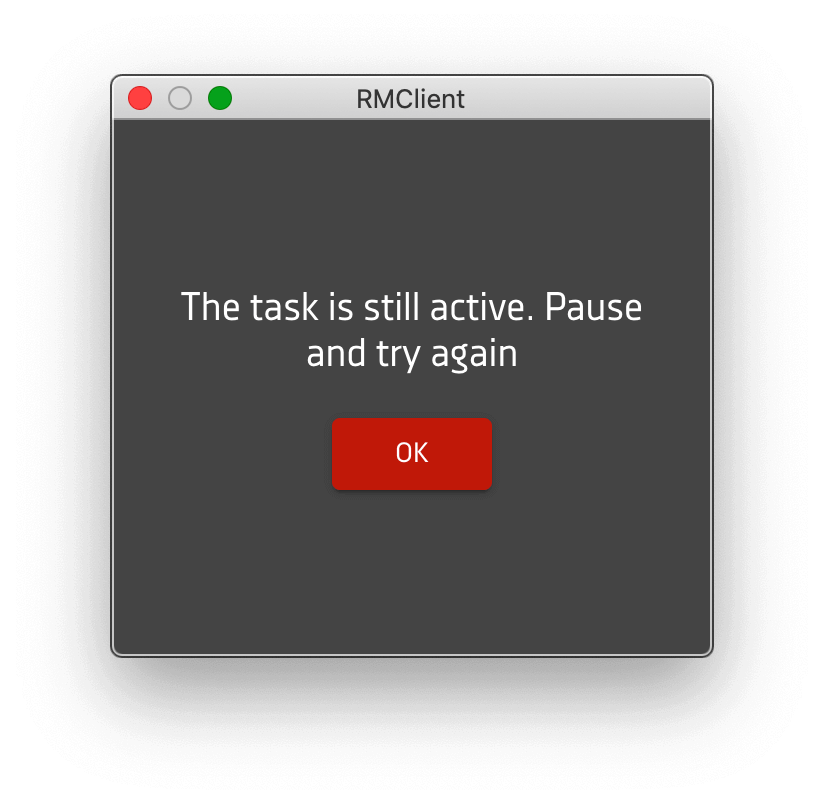
If you attempt to terminate an application when there is an Active Timer Task, a notification appears that you must stop the task timer after you try again.
If there is no Task with the active timer in the app, a notification will appear with the question "Are you sure you want to close RMClient?

The application will be closed after confirmation of the action by pressing the EXIT button in the notification window.
You can disable the output of the dialog box by enabling the checkbox "Do not ask again?"
Get in touch
E-mail us to discuss and implement your project, application or service. We will answer all of your questions and will offer the best solutions.

